
Starjammer
Introduction
Starjammer is a team comprised of two reworked characters and three new ones, poised to dominate the Cosmic Crucible game mode. From all indications, they will be incredibly strong in this setting and capable of defeating both the Mephisto and Odin teams. They should also be able to beat currently the top defensive team in the Crucible – Odin combined with the Illuminati.
This team consists of one Protector, one Support, and three Blasters, featuring two Tech characters, one Mutant, one Skill, and one Bio character. They excel in damage and control, boasting remarkable levels of mitigation and sustain.
Team Members
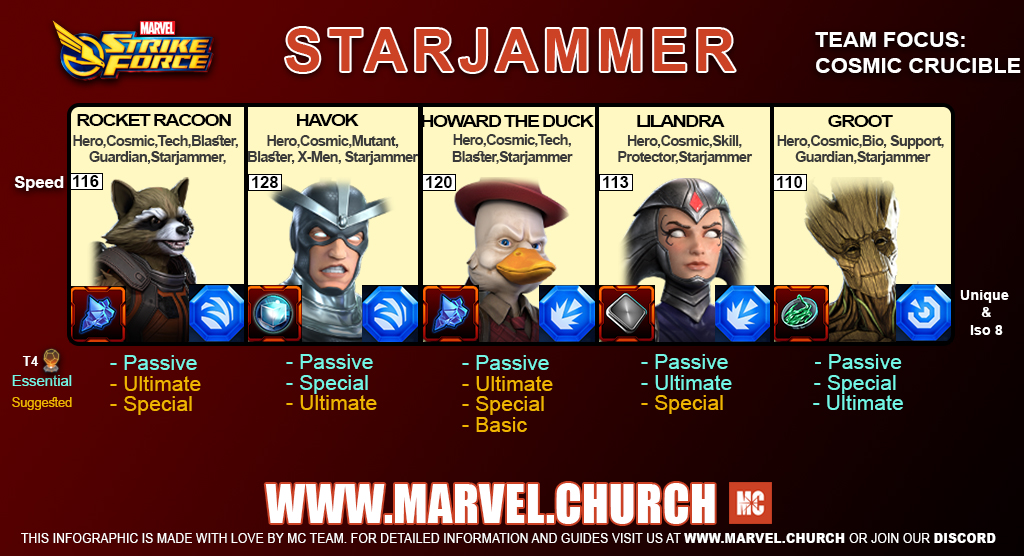
(left to right)
Utility
- Cosmic Crucible
In the Cosmic Crucible, Starjammer receives additional bonuses, allowing them to function effectively both offensively and defensively. They are also expected to perform well in other game modes, particularly Alliance War because they possess an impressive range of abilities that prove useful even outside the Crucible.
Lilandra is essential for unlocking Professor X, and all active players will have the opportunity to collect 7 Yellow Stars for her through various Events. Thus, this team is extremely important, as it addresses the challenge posed by the Odin and Illuminati combination in the Crucible, while also being valuable in other contexts.
Team Placement & Turn Order
Put Groot in a corner – he can get Taunt ability, which helps protect the rest of the team. We’ll place Lilandra next to him because she is a Protector with high armor and health. Meanwhile, three Blasters will be placed on the other side: Howard the Duck in the center, Havok next to him, and Rocket in the other corner.
Turn Order:
- Havok
- Howard the Duck
- Rocket Raccoon
- Lilandra
- Groot
Iso-8 Classes
- Rocket Raccoon – Striker/Raider
- Havok – Raider/Striker
- Howard the Duck – Raider/Striker
- Lilandra – Raider
- Groot – Skirmisher/Healer
For Groot, even though he has Taunt and will absorb most of the opposing team’s damage, it’s best to classify him as a Skirmisher. This allows for a strong synergy with Rocket Raccoon, creating an effective Striker-Skirmisher combo if we equip Rocket with the Striker Iso-8 Class. Groot has a constant Revive ability, and when he dies, he buffs the rest of the team with Defense Up, Speed Up, Offense Up, and Counter. Therefore, it can be advantageous for us if opponents eliminate him, as that will grant buffs to all Starjammers and he will come back to life with 100% Health (a 100% chance to Revive while the entire team is present). The only threat arises from characters like Apocalypse or when Mephisto is present, as they can permanently eliminate him.
Lilandra attacks multiple enemies with her abilities, so it’s best to assign her the Raider Iso-8 Class. Howard the Duck is a fantastic Raider but can also function as a Striker, just like Havok. We will assign Rocket Raccoon as a Striker to create synergy with Groot, since when Rocket uses his Special, Groot will assist him. However, be cautious not to assign the Striker class to both Howard and Havok; at least one, or even both, should be Raiders. To maximize their passive damage output, equipping both with the Raider class is the most effective approach.
Team T4’s
Essential
- Rocket Raccoon – Passive
- Havok – Passive and Special
- Howard the Duck – Passive
- Lilandra – Passive and Ultimate
- Groot – Passive, Special, and Ultimate
Rocket Raccoon
Rocket Raccoon’s Passive, when fully leveled up, allows him to apply Offense Up to himself and two random allies who do not already have Offense Up for two turns (increased from one turn). An even more noteworthy upgrade is that he will reduce enemy Critical Hit Chance by 100% (up from 50%) if he has four or more Starjammer allies. Consequently, opponents facing a Starjammer team will be unable to land Critical Hits unless their Critical Hit Chance exceeds 100%.
Havok
Havok’s Passive Ability allows him to counterattack when an enemy targets him or any Starjammer. If his passive is maximized, he will deal 300% Piercing damage (up from 200%). This is a significant upgrade, as it effectively doubles the passive damage Havok can inflict when countering opponents.
When Havok’s Special is maximized, he will deal increased damage and apply Trauma to each target. Since the Special attacks multiple enemies (both primary and adjacent targets), it provides a great opportunity to inflict Trauma on several opponents. Primary targets will receive two instances of Trauma (as Havok applies Trauma to primary targets even without the upgrade), while adjacent targets will receive one instance each.
Howard the Duck
Howard the Duck’s Passive Ability, when fully upgraded, prevents enemies from filling their Speed Bar or reducing the Speed Bar of our Starjammers in the Crucible before he takes his turn (he prevents Speed Bar manipulation for the entire match if he is in full Starjammer team and is not Exhausted). The Starjammer team is significantly faster in Crucible than in other game modes, making it crucial to hinder the opponent’s ability to manipulate Speed Bars.
Lilandra
Maxing out Lilandra’s Passive Ability is essential for this team. On any turn, if Lilandra is not Exhausted, she converts all Vulnerable effects on herself and all Starjammer allies into Regeneration. This mechanic greatly impacts the opposing teams, as their Strikers will be unable to perform follow-up attacks unless they are directly linked to a Striker-Skirmisher combo. Additionally, opposing Skirmishers cannot remove positive effects from the Starjammer team, because when they attack a target, that target will not have Vulnerable status. This transformation of Vulnerable into Regeneration greatly enhances the team’s sustainability.
Lilandra’s Ultimate Ability deals increased damage and applies Trauma to all enemies during each attack in Crucible mode. Since she strikes all opponents three times with her Ultimate, each enemy will receive three Trauma effects after her attack. This powerful upgrade ensures that the opposing team cannot remove debuffs from themselves.
Groot
Groot’s Passive, when fully leveled, grants him an additional 20% increased chance to Revive for each Starjammer ally. When he revives, he regains 20% of his maximum health for each Starjammer ally. This results in a 100% chance of revival, with 100% Health, which is crucial for the entire team. Every time Groot dies, he buffs his allies, and then Revive. If he dies again, he buffs them again, and again Revive. As long as the opposing team does not secure a permanent kill, or kill someone else from the Starjammer team, this cycle can continue.
When we maximize his Special Ability, Groot will deal slightly more damage. More importantly, he will apply Safeguard for two turns to himself and all Starjammer allies. This means that, in addition to his Ultimate ability, Groot can also grant Safeguard to the entire team with his Special.
Speaking of his Ultimate Ability, Groot will heal himself and all allies for 15% of his maximum health (increased from 10%). Furthermore, he will generate 2 Ability Energy for his Rocket Raccoon ally (up from 1). In the Crucible, if there are 3 or more Starjammer allies, he will instead generate 2 Ability Energy for the entire team.
Recommended
- Lilandra – Special
- Howard the Duck – Ultimate, Special, and Basic
- Havok – Ultimate
- Rocket Raccoon – Ultimate and Special
Rocket Raccoon
To boost the overall damage of the Starjammer team, it’s crucial to max Rocket Raccoon’s Ultimate. When maxed, Rocket Raccoon will inflict more Piercing damage on all enemies. Additionally, if Groot is on the team, he can flip all negative effects affecting both himself and Groot (increased from three negative effects).
Maxing Rocket Raccoon’s Special not only increases damage output but also provides various advantages for the entire team, depending on who assists him alongside Groot. When Rocket Raccoon uses his Special and it is maxed, a random ally will now assist him (increased from a 60% chance of a random ally assisting). If he is assisted by Lilandra, the entire team in the Crucible will gain +1 Deflect. If Howard the Duck assists, the whole team will receive Offense Up for 2 turns in the Crucible. Finally, if Havok is the ally assisting him, he will flip a negative effect into a positive one to himself, or flip two negative effects into positive ones if Havok’s Basic is maxed.
Havok
Havok, when his Ultimate is maxed, deals increased Piercing damage, applies Defense Down for 2 turns (up from 1 turn), and, upon defeating an enemy, grants Safeguard for 2 turns (previously 1 turn) to himself, all Starjammers, and all X-Men allies. This upgrade is significant because it enhances the likelihood that Havok will defeat his target with his Ultimate, allowing him to apply essential buffs to his team for a longer duration.
Howard the Duck
When Howard the Duck’s Ultimate is maxed out, he deals more Piercing damage and inflicts Trauma for 2 turns on both primary and adjacent targets, in Crucible, provided he has 4 or more Starjammer allies. This is a significant improvement because Piercing damage ignores the opponent’s Armor, making it essential to upgrade abilities that deliver this type of damage. Inflicting Trauma for 2 turns is also a key objective of this attack.
Upgrading the Special Ability is straightforward, as it results in higher damage output—nothing more, nothing less. However, since this damage is Piercing and Howard the Duck attacks all targets with his Special, it’s advantageous to enhance this ability as well. This way, we can deal significantly more damage overall.
Maximizing Howard the Duck’s Basic attack also results in a substantial damage increase. Not only does the primary damage increase, but in Crucible, he performs 2 additional Bonus Attacks. The sequence works like this: Howard attacks the primary target and then executes 3 Bonus Attacks on that same target. Outside of Crucible, he only performs one Bonus Attack. However, for our team’s strategy, the Crucible settings are critical.
Lilandra
If we maximize Lilandra’s Special, she will deal increased damage and perform a Rebound Chain to 4 adjacent targets, up from 3. This upgrade not only boosts damage output but also allows for the possibility of doing significantly more damage to specific targets with a bit of luck.
Red Stars and Diamonds
Getting 7 Red Stars on the new characters (Howard the Duck and Havok) shouldn’t be complicated, as long as you open Elite Red Star Orbs when they are featured there. Red Stars for Lilandra, for now, are available during her Event from the Battle Pass. Groot and Rocket Raccoon are older characters, so plenty of players might have them at high Red Stars already.
You could also get Red Stars for them from the Incursion Campaign:
- 6 Red Stars for Groot – Incursion 5-5
- 7 Red Stars for Rocket Raccoon – Incursion 6-4
When the Lilandra, Howard the Duck, and Havok become farmable and free-to-play players are able to collect 7 Yellow/Red Stars for them, we also recommend using Diamonds for them (2 Diamonds at least).
For the two reworked characters, we also recommend a minimum of 2 Diamonds. Prioritize Groot over Rocket Raccoon.
Farming Locations
- Rocket Raccoon – Versus Orb, Character Store (Age of Xavier)
- Havok – Versus Orb, Character Store (Age of Xavier)
- Howard the Duck – Versus Orb, Character Store (Age of Xavier)
- Lilandra – Villains Hard 7-6, Versus Orb, Character Store (Age of Xavier)
- Groot – Villains 1-9, Versus Orb, Character Store (Age of Xavier)
On Spawn Buffs and Crucial Passive Effects In Battle
Team On Spawn Buffs:
In all game modes – Defense Up (2 turns)
In Cosmic Crucible – Fill Speed Bar by 35%
Starjammer:
- In Crucible, gain +5% Speed for each Starjammer ally, up to a max of +20% Speed
- On any Turn, flip all Vulnerable to Regeneration, if Lilandra is not Exausted
- Cannot gain Slow in Crucible if Lilandra has 4 Starjammer allies
- +500% Focus until Groot takes a turn
- Apply Defense Up, Speed Up, Offense Up, and Counter on Groot’s Death
- +100% Counterattack chance (if you bring Nova (Sam Alexander))
- On each character’s turn, Barrier entire team by 10% of Nova’s (Sam Alexander) Health, while Nova (Sam Alexander) is Charged (if you bring Nova (Sam Alexander))
Enemies:
- Lower Crit Chance by 100% and lower Max Barrier by 25% if Rocket Raccoon has 4 Starjammer allies
- Apply +1 Disrupted on turn to each enemy with Barrier, and if Havok has 2 Starjammer allies
- Enemies with Barrier cannot gain Immunity, and lower Damage Reduction for all enemies with Barrier by 25%
- When an enemy attacks any Starjammer character, Havok will attack that enemy for 300% Unavoidable Piercing (+50% damage if that enemy has Barrier)
- On the enemy’s turn, if that character has Barrier, Howard the Duck will attack that enemy for 200% Piercing
- Cannot gain Evade if Howard the Duck has 4 Starjammer allies
- In Crucible, cannot fill or reduce the Speed Bar for themselves, allies, or enemies until Howard the Duck takes his turn. If Howard has 4 Starjammer allies and does not have Exhausted, this effect persists after he takes a turn
- In Crucible, Speed can only be altered by Positive and Negative effects, if Howard the Duck has 4 Starjammer allies
- Apply +1 Offense Down on turn, if that enemy has Barrier
- In Crucible, Cosmic Protectors cannot gain Taunt
- Cannot gain Speed Up in Crucible if Lilandra has 4 Starjammer allies
- Lower the Assist Chance by 100% if Groot has 4 Starjammer allies
- Cannot gain Safeguard or Immunity if Nova (Sam Alexander) is Charged and has 4 Starjammer allies (if you bring Nova (Sam Alexander))
Team Mechanics
Starjammer will excel not just in the Crucible but everywhere they are deployed. They possess an exceptionally offensive range of abilities that can dominate their opponents. Currently, in the Crucible, there isn’t a team that can match their strength. Many of their abilities and passive improvements require the entire team to function effectively, making it unwise to combine them with other plug-and-play characters, as this will result in greater losses than gains.
The same applies to outside the Crucible, though to a lesser extent. In Alliance War, we can see Starjammer synergizing with strong plug-and-play characters.
Starjammer offers substantial damage output, both active and passive, alongside excellent crowd control. Their damage mitigation and sustainability are also commendable. Their mechanics allow them to counter virtually everything in the Crucible (or almost everything), easily establishing them as one of the top teams in the game overall. It is important to note that Lilandra is a key character for unlocking Professor X, and she will be available to all active players with up to 7 Yellow Stars.
Rocket Raccoon
Rocket Raccoon is a Blaster on the Starjammer team, and he has additional synergy with Groot. Specifically, all of Rocket’s abilities are enhanced when Groot is his ally. He boasts superior damage and an increased critical hit chance, making him a formidable opponent. Additionally, he passively reduces the enemy’s critical hit chance when part of a full Starjammer team, virtually eliminating their ability to land critical hits against the Starjammers. Through his Passive ability, Rocket also boosts the damage of himself and Howard the Duck. While this boost may seem minor at first glance, it can make a significant difference in battle.
Rocket’s attacks are primarily Unavoidable; some are Piercing and can ignore Defense Up, while most cannot be blocked, making him an incredibly dangerous damage dealer.
Rocket attacks the primary and adjacent targets, with an additional +15% critical hit chance (increasing to +20% if the Basic is maxed). If Groot is his ally, Rocket Racoon’s Basic attack becomes Unavoidable. This is a classic Blaster attack that delivers high damage without providing significant buffs to teammates or debuffs to opponents.
The Special costs 3 Ability Energy and can be used on the first turn. Rocket attacks the primary target and gains a +8% critical hit chance for each Starjammer ally (up to +32% on a full Starjammer team). After the attack, he applies Taunt (for 2 turns) and Immunity (for 2 turns) to ally Groot, and calls Groot to attack the primary target. Following Groot’s attack, Rocket gets an assist from a random ally. Thus, the target is attacked three times—first by Rocket, then by Groot, and finally by a random ally—which can result in massive damage, potentially even taking out the target. If Rocket has 4 or more Starjammer allies, this attack is Unavoidable and cannot be blocked. In addition to delivering significant damage, this Special move also protects the rest of the team by placing Taunt on Groot. Depending on which ally assists, the entire team might benefit in various ways.
Rocket’s Ultimate attacks all opponents with Piercing damage and grants himself 2 Counter. If Groot is an ally, Rocket flips all negative effects on himself and Groot, applies an additional 2 Counter to himself, and to all Guardian and Starjammer allies. This attack ignores Defense Up, is Unavoidable, and cannot be blocked. The Ultimate costs 4 Ability Energy and can be used on the second turn, demonstrating its strength when Groot is present.
On his turn, Rocket applies Offense Up (for 2 turns) to himself and 2 random allies who do not already have Offense Up. This significantly enhances the team’s offensive capability. If there are 4 or more Starjammer allies, Rocket reduces the enemies’ critical hit chance by 100% and lowers the Max Barrier of all enemies by 25%. Consequently, only opponents with a critical hit chance exceeding 100% can land a critical hit against the Starjammer team. Additionally, through this Passive Ability, Rocket gains +5% Damage for himself and all Tech allies.
Havok
Havok is a Blaster capable of dealing immense amounts of damage to a single target while also performing area of effect (AoE) attacks. When any of his allies are attacked, Havok passively counters the attacker. He also reduces damage mitigation for all enemies with Barrier, preventing them from gaining Immunity, and in Crucible, he increases the Speed stat of all Starjammer characters. Havok excels at crucial debuff combos, such as Stun + Trauma and Heal Block + Trauma. Additionally, if he eliminates an opponent using his Ultimate ability, he grants the entire team a Safeguard buff.
Havok attacks the primary target with Basic and applies Slow. He then chains to one adjacent target, applying Slow to that target as well. Before he attacks, he flips one (or two, if Basic is maxed) random negative effects on himself. This means he can convert negatives into positives while simultaneously slowing down one or two opponents.
Costing 5 Ability Energy, Havok can use his Special Ability in the first turn. He attacks the primary target, applying Stun (for two turns) and Trauma (for one turn). After the initial attack, he attacks both the primary and adjacent targets, applying Heal Block (for two turns) to each and adding +1 Trauma to each target, resulting in +2 Trauma for the primary target and +1 Trauma for adjacent targets. This attack is unblockable and cannot be counterattacked. If the Starjammer team is on Crucible Defense, Havok will target a random enemy Controller with Charged instead, ignoring Taunt and Stealth. Therefore, Black Panther and Shuri must be cautious when engaging the Starjammer team with the Illuminati in the Crucible.
Havok’s Ultimate attacks the primary target with massive Piercing damage, applies Defense Down (for two turns), and clears all positive effects and all Charged on the primary target. If he kills the target, Havok grants himself, all Starjammer allies, and all X-Men allies a Safeguard. After the attack, he extends the duration of Defense Down by one turn for each enemy with a Barrier, further reducing their damage mitigation. This attack ignores Defense Up and gains Havok an additional 100% Damage if the primary target has a Barrier. The Ultimate costs 5 Ability Energy and can also be used in the first turn, allowing Havok to potentially eliminate an opponent.
Whenever an opponent attacks Havok, a Starjammer ally, or an X-Men ally, Havok, through his Passive, counters by attacking that enemy for 200% Piercing damage. This counterattack is unavoidable and gains an additional 50% damage if the targeted enemy has a Barrier.
These counters can deal substantial damage, especially considering that Howard the Duck also attacks enemies with a Barrier on their turn. For instance, if an opponent with a Barrier takes their turn against the Starjammer team, Howard the Duck will attack them first, then the opponent will do his action – most likely attack Starjammers, and finally, Havok will retaliate with his own powerful counterattack. Since both (Howard and Havok) deal Piercing damage and have high Damage stats, this unfortunate opponent can be taken down quite easily.
On the enemy’s turn, if that enemy has a Barrier and Havok has two or more Starjammer or X-Men allies, he will apply +1 Disrupted (up to a maximum of 3) to that enemy, preventing them from buffing themselves before their attack. Opponents with Barriers cannot gain Immunity, and their Damage Reduction is decreased by 25% due to Havok’s Passive ability.
In Crucible, Havok and all Starjammer allies gain +5% Speed for each Starjammer ally, up to a maximum of +20% Speed. Thus, the more Complete the Starjammer team is, the faster the Starjammer characters become in Crucible.
Howard the Duck
Howard the Duck is a Blaster who significantly enhances the Starjammer team’s performance, making them an APEX Crucible team. His attacks are all Piercing, allowing him to ignore opponents’ Armor and deal massive damage. Additionally, most of his attacks hit multiple enemies, making his damage output a crucial asset for the team. He also boosts the Starjammer team’s speed in the Crucible and can prevent opponents from increasing their Speed or Speed Bar before he takes his first turn. As a result, teams that typically rely on gaining speed advantages at the start will find themselves at a disadvantage against the Starjammers until Howard has his turn.
When using his Basic attack, Howard gains Offense Up for 2 turns. In Crucible, he applies Offense Up to himself and all Starjammer allies instead. He then attacks the primary target and gets 1 Bonus Attack with Piercing damage. In Crucible, he executes 2 additional Bonus Attacks. This makes his Basic attack extremely powerful, resulting in a total of 4 hits (the primary attack plus 3 Bonus Attacks).
His Special requires 5 Ability Energy and can be used on the second turn. Before attacking, Howard clears Barrier and 2 positive effects from all enemies. He then attacks all enemies with Piercing damage. For each enemy that had a Barrier at the start of his turn, Howard gains +25% Damage, up to a maximum of +200%. For instance, if 5 opponents had a Barrier before he used his Basic, he would first remove those Barriers and then attack with increased damage, achieving a +125% boost for that attack (25% for each of the 5 enemies with Barrier). This can lead to unprecedented damage against multiple opponents with Barrier.
Howard’s Ultimate costs 6 Ability Energy and can be used on the first turn. He attacks the primary and adjacent targets with Piercing damage while applying Ability Block (2 turns) and Disrupted (2 turns). This move allows Howard to inflict an Ability Block on multiple enemies simultaneously. In Crucible, if he has 4 or more Starjammer allies, he will also apply Trauma (2 turns) to all enemies. This attack gains +25% Extra Damage against targets with Barrier and ignores Defense Up, making it a potent damage source while also applying Trauma across the board.
Through his Passive ability, Howard applies Defense Up (2 turns) to himself and all Starjammer allies upon spawning. In Crucible, he fills the Speed Bar for himself and all Starjammer allies by 15% plus an additional 5% for each Starjammer ally. If Howard is part of a full team, this grants a total of +35% Speed Bar fill. During the enemy’s turn, if an enemy has a Barrier, Howard will attack that enemy for 200% Piercing damage. This is one of the anti-barrier mechanics for the Starjammer team.
If Howard the Duck has 4 or more Starjammer allies, opposing characters cannot gain Evade, enhancing the offensive efficiency of the Starjammer team.
In the Crucible, before Howard takes his turn:
- The Speed Bar cannot be filled or reduced for any enemy, whether for themselves or their allies (this does not include Speed Bar gained through normal means). If Howard has 4 or more Starjammer allies and does not have Exhausted, this effect persists after he takes a turn. Practically during the entire match.
- If he has 4 or more Starjammer allies, the Speed of all enemies can only be altered by positive and negative effects.
This is the most crucial part of Howard’s Passive ability, as it prevents opponents from passively increasing their Speed stat, filling their Speed Bar, or decreasing the Speed Bar of the Starjammer team before Howard takes a turn (he prevents Speed Bar manipulation for the entire match if he is in full Starjammer team and is not Exhausted). For example, characters like Mephisto cannot passively increase their Speed by +666% at the start of the battle, Kahhori cannot take multiple actions, Old Man Logan cannot increase his Speed Bar when attacked, and Super Skrull cannot reduce the Speed Bar of any Starjammer with his Special if he even manages to play before Howard has acted, and so on, and so on.
Lilandra
Lilandra is a Protector with high stats who does not provide direct protection to her team but rather does so indirectly. She applies Taunt to her ally Groot and summons Gladiator when her health drops below 50%. Gladiator spawns with Taunt, enhancing the team’s defense. Lilandra is skilled at applying crucial negative effects on enemies and offers essential protection in the Cosmic Crucible. She can punish opposing teams that utilize Barrier by applying Offense Down to an enemy during that enemy’s turn if they have a Barrier. Additionally, on any turn when she is not Exhausted, Lilandra can flip Vulnerable on herself and all Starjammer allies to Regeneration.
Lilandra plays a pivotal role in her team by preventing Cosmic Protectors from gaining Taunt. With a full Starjammer team, she also stops opponents from gaining Speed Up and ensures her Starjammer allies cannot gain Slow.
With Basic, she attacks the primary target and applies Offense Down. If Gladiator is her ally, she will grant him an Assist Now. If the primary target has a Barrier, Lilandra gains +1 Deflect. In Cosmic Crucible, she grants +1 Deflect to herself and all allies instead.
Her Special costs 4 Ability Energy and can be used in the first turn. Lilandra first clears all Barriers from enemies, then attacks the primary target, applying Defense Down (for 2 turns) and Slow (for 2 turns). She then uses a Rebound Chain to hit 4 adjacent targets, applying +1 Offense Down and +1 Heal Block with each hit. Counterattacks can break this chain, but if Lilandra has 3 or more Starjammer allies, her attack cannot be countered.
After her attack, she grants Barrier to herself and all allies for 20% of her Max Health. If Groot is an ally, she also applies 2 Regeneration (for 2 turns) and 2 Taunt (up to a maximum of 3) to Groot. This means she can attack multiple enemies, reduce their healing capabilities, diminish their offensive potential, and provide her team with Barrier and Taunt on Groot.
Lilandra’s Ultimate ability costs 6 Ability Energy and can also be used in the first turn. In Crucible, before attacking, she clears all Barriers on enemies, and if she has 3 or more Starjammer allies, she reduces the duration of all positive effects by 2 on each enemy (any positive effect that has a duration of 0 expires instantly, including Safeguard – anti-Safeguard mechanic); however, this does not apply outside of Crucible. She attacks all opponents, delivering a total of 3 attacks — the initial attack followed by 2 bonus attacks. This attack is Unavoidable, and cannot be blocked or countered. In Crucible, each attack also applies Trauma to the enemies (3 Trauma in total). If Lilandra gets a kill, she clears all negative effects from herself and all Starjammer allies, then grants them Immunity (for 2 turns) and Safeguard (for 2 turns) as well.
Through her Passive Ability, the first time Lilandra drops below 50% Health, she summons Gladiator, which can only trigger once per match. This provides extra protection as Gladiator also spawns with Taunt. On any turn, if Lilandra is not Exhausted, she flips Vulnerable for herself and all Starjammer allies to Regeneration. This means opponents will not be able to benefit from Vulnerable in any way; Strikers cannot perform follow-up attacks, Skirmishers cannot remove buffs, and Healers cannot cleanse Bleed or apply Regeneration to their allies.
On the enemy turn, if an enemy has a Barrier, Lilandra will apply +1 Offense Down (up to a maximum of 3) to that enemy, reducing their offensive potential.
In Cosmic Crucible, enemy Cosmic Protectors cannot gain Taunt, which is particularly effective against teams like Annihilator (since Gladiator is a Cosmic Protector and won’t protect the rest of the team). Additionally, if Lilandra has 4 or more Starjammer allies, enemies cannot gain Speed Up, and she and her Starjammer allies cannot gain Slow. This powerful Passive allows Lilandra to nullify any Speed Up advantages for opponents and ensures that her team isn’t hindered by Slow.
Groot
Groot is a Support character who heals and buffs the team, while also providing protection by gaining Taunt through the abilities of Rocket Raccoon and Lilandra. He passively reduces the enemy’s assist chance, making it difficult for opponents to assist against the Starjammer team. When Groot dies, he provides buffs to the entire team and then comes back to life. His buffs are incredibly valuable, making him a key factor in the Starjammer team’s sustain and mitigation capabilities.
Groot attacks the primary target with his Basic and gains 2 Regeneration for 2 turns. He also grants 2 Regeneration to the two most injured allies. While this ability may seem basic, it can be useful in specific situations.
The Special costs 3 Ability Energy and can be used on the first turn. Groot clears all negative effects on himself and all allies, applies 2 Deathproof and Defense Up (for 2 turns) to himself and all allies, and grants Safeguard (for 2 turns) to himself and all Starjammer allies. Following this, Groot attacks the primary target and flips 2 random positive effects on it. Then he calls a random Starjammer ally to attack the primary target. In Crucible, he will call 2 Starjammer allies with the highest Damage to attack the primary target instead of just one. This ability has a short cooldown and is highly effective for cleansing negative effects and buffing the team, while also dealing significant damage to opponents.
Ultimate costs 5 Ability Energy and can be activated on the first turn. Groot reduces the duration of all negative effects on himself and all Starjammer allies by 2. Any negative effects with a duration of 0 expire instantly, including Trauma. He also clears 2 negative effects from all other allies. This mechanic is similar to that of Shadow King and is one of the few methods to remove Trauma in the game. After cleansing the Starjammer team of negative effects, Groot heals himself and all allies for 15% of his Max Health. He then applies Immunity (for 2 turns) to himself and all Starjammer allies. Finally, Groot generates 2 Ability Energy for a random Rocket Raccoon. If he has 4 or more Starjammer allies, he generates 2 Ability Energy for himself and all Starjammer allies instead, but only in Crucible. This Ability, especially in Crucible, is multifunctional, as it not only removes most debuffs from the team but also grants Safeguard, Immunity, and 2 Ability Energy to all members, allowing them to use their abilities sooner.
Whenever Groot is attacked, he gains +1 Counter and applies Slow to the attacker through his Passive. If there are 4 or more Starjammer allies, Groot lowers the assist chance for all enemies by 100%. Until he takes a turn, Groot and all Starjammer allies gain +500% Focus. Since he is the slowest character on the team, everyone else will act before him, applying negative effects to opponents with minimal resistance due to the high Focus buff.
On Death Effects:
Groot has a 20% chance to revive with 25% of his Max Health. For each Starjammer ally, he gains an additional +20% Revive Chance and revives with an extra +20% of his Max Health. He applies Defense Up to all allies and grants Speed Up, Offense Up, and Counter to all Guardian and Starjammer allies, as well as applying Deathproof to a random Rocket Raccoon ally.
In summary, whenever Groot dies, he grants significant buffs to the entire team and has a 100% chance to revive as long as the team is complete. If the opponents cannot eliminate another Starjammer character or two before Groot acts, they may find themselves in a challenging situation where Groot continues to revive and buff his team. A permanent elimination of Groot is the only way to prevent this cycle if opponents are unable to take down the other Starjammers first.
Nova (Sam Alexander) as sixth Starjammer
You can find all the information about Nova (Sam Alexander) on the Champion team page HERE.
Nova (Sam Alexander) is an outstanding addition to the Starjammer team, bringing several unique strengths that make him a clear upgrade over Rocket Raccoon. The main trade-off is that by removing Rocket, the team loses some offensive potential—Rocket passively boosts damage for himself and Howard, and provides Offense Up on the turn to himself and two random Starjammer characters who don’t have it. The team also sacrifices some mitigation, as Rocket prevents enemies from landing critical hits by lowering their Crit Chance by 100%. However, what you gain with Nova more than makes up for those losses.
Nova spawns with Taunt and also gains Charged, so you finally get a pre-taunt Protector on the team who can provide decent coverage for the rest of the squad. It’s not perfect and won’t protect against every threat, but it’s a definite upgrade compared to running Starjammers without him. As long as he has Charged, on his or any Starjammer ally’s turn, Nova will Barrier himself and all Starjammer allies by 10% of his Max Health, adding another layer of mitigation. If he’s Charged and has four Starjammer allies present, opponents cannot gain Safeguard or Immunity, which is a huge advantage against teams that rely on these buffs, especially at the start of a fight.
Nova’s own survivability is further boosted while Charged thanks to extra Block Amount, Block Chance, and Resistance, making him a solid Protector for Starjammers. He also provides a 100% Counterattack chance to himself and all Starjammer allies, which is always active and not tied to the Charged mechanic.
All of Nova’s attacks hit multiple enemies, so it’s best to give him the Raider Iso-8 class. His Basic targets the primary and adjacent enemies and grants him Regeneration (2 turns). If he’s Charged, he’ll also clear all negative effects from himself and lose Charged. While this is useful for self-cleansing, it comes at the cost of losing all the mitigation benefits associated with Charged, like team Barriers, blocking Safeguard/Immunity, and the extra defense stats. Fortunately, Counterattack remains active regardless.
His Special attacks primary and adjacent targets, applies Slow to each, and if any already have Slow, he applies Ability Block instead. He also heals himself and gains Taunt, making this a strong move for both controlling enemies and reinforcing himself. The Ultimate hits all enemies, applies Offense Down and Heal Block (both for 2 turns), flips Taunt on the primary target (so enemies lose their protection), gives Barrier to himself and all Starjammer allies, and clears all negative effects from the whole team—an extremely strong ability overall.
Nova has Speed 117, so he will act after Havok and Howard the Duck, and before Lilandra and Groot. His speed is almost identical to Rocket’s (116), so the overall team turn order remains functionally the same.
All in all, Nova (Sam Alexander) is a fantastic upgrade for Starjammers and is best used instead of Rocket Raccoon. With Nova, the team gains much stronger mitigation and versatility, making them far more resilient and harder to counter in a variety of Crucible scenarios.
Starjammer Anti-Barrier Mechanic
The Starjammer team has numerous advantages when countering opponents with Barrier, many of which are crucial to gameplay.
Lilandra:
- Gains +1 Deflect when attacking enemies with Barrier with Basic.
- In Crucible, the entire team gains +1 Deflect if she attacks an enemy with Barrier with Basic.
- Passively applies Offense Down to enemies with Barrier on their turn.
Howard the Duck:
- For each enemy with Barrier at the start of his turn, he gains +25% Damage, up to a maximum of +200% for his Special attack.
- His Ultimate gains +25% Extra Damage and ignores Defense Up against enemies with Barrier.
- Passively attacks enemies with Barrier on their turn for 200% Piercing damage.
Havok:
- Havok’s Ultimate ignores Defense Up and gains +100% Damage against enemies with Barrier.
- Passively applies +1 Disrupted to enemies with Barrier on their turn.
- Enemies with Barrier cannot gain Immunity due to Havok’s Passive.
- Reduces Damage Reduction by 25% to enemies with Barrier through Passive.
Passive Stats Increases
+500% Focus for the entire team until Groot takes a turn.
+5% Damage for Rocket Raccoon and Howard the Duck.
Combat Tips & Tricks
Starjammers are formidable characters in Marvel Strike Force, making them a top-tier unit, especially in the Crucible game mode. Their Crucible bonuses remain active during both offense and defense, allowing them to be effective even when placed on defense. This means that opposing teams will need to exert considerable effort to defeat them.
One of the key advantages for the Starjammers stems from Howard the Duck’s Passive Ability. His Passive prevents enemies from filling up their Speed Bar or increasing their Speed stat until it’s their turn to play. This gives the Starjammer team a significant edge right from the start of the fight. For instance, they can stop Mephisto from gaining +666% Speed at the beginning of the match, ensuring he cannot play first. However, if the opponents have a Barrier, the Speed stat of all Starjammer characters is boosted. This allows them to act sooner due to Havok’s passive ability. Additionally, Howard the Duck’s ability to passively charge the Speed Bar (unless countered by an opponent’s passive) further reinforces the Starjammers’ advantage at the start of each fight.
Lilandra plays a crucial role as well, preventing opponents from gaining Speed Up and ensuring that the Starjammers cannot be affected by Slow. This positions her team favorably even against the fastest Crucible team, the Illuminati. Since all Illuminati characters spawn with a Barrier, the entire Starjammer team will act before Black Panther (Shuri), the fastest member of the Illuminati. This is thanks to Havok’s ability to boost the Speed stat of characters facing opponents with a Barrier and Lilandra’s capability to deny the Illuminati Speed Up on spawn. Even when facing a combination of three Illuminati characters plus Odin and another character, all Starjammers will still act before Shuri.
Havok’s turn is critical; he can either significantly weaken an opponent with his Ultimate or control the fight by applying Stun, Trauma, and Heal Block to a primary target and Trauma and Heal Block to secondary targets (with the Special ability). The decision on whether to use the Ultimate or Special depends on the situation, the strength of Havok, the endurance of the target, and the urgency of controlling an opponent.
Next up is Howard the Duck, who unleashes his Ultimate to deal massive damage while applying Ability Block to multiple enemies. Following him, Rocket likely uses his Special ability to eliminate one opponent, simultaneously placing Taunt and Immunity on Groot to protect the team.
Lilandra then has the option to use either her Special or Ultimate ability. In most situations, her Ultimate is preferable at the start of the fight as it can potentially eliminate an opponent and provide crucial buffs to her team. Finally, Groot plays, capable of removing negative effects and providing buffs, heals, and importantly, applying Safeguard to the entire team, no matter which ability he uses. His Special can also deal damage to an enemy, while his Ultimate can provide Healing and generate Ablity Energy to the entire team when needed.
Overall, the Starjammers form a forceful team for Crucible matches. While they still require testing against various opponents, their advantages are apparent. For instance, against Cabal in Crucible Defense, Lilandra’s passive ability can neutralize their Vulnerable status, giving the Starjammers a substantial edge. Even though Cabal can hinder their Speed Bar fill due to their abilities, Lilandra can only remove Vulnerable when it’s a character’s turn, which will happen after the spawning buffs. Thus, even if some characters may initially have a Speed advantage against the Starjammers, by the time Havok takes his turn The Leader’s Passive grants a Barrier to Cabal, leveling the Speed playing field.
In summary, the Starjammers are poised to be an over-the-top team for both Crucible Offense and Defense. Whether they can triumph over every possible combination of characters remains to be seen, but we’ll need to fully assemble the team and test them against various challenges to draw any definitive conclusions.
If you have any questions about Starjammer team or need any help with MSF feel free to reach out to us via our Discord:
Search Teams
Type the name of the team in the search box. The team’s names will appear below the search box. Click on the title.
