
Breaker Event: Silver Surfer
Intro
Silver Surfer (Breaker) is the first Legendary character in the Age of Fear saga. You’ll be able to unlock him through the Breaker Event: Silver Surfer, which works similarly to previous Scourge and Trials events. If you’ve participated in those before, the structure of Breaker Events will feel very familiar.
How Breaker Events Work: Breaker Events use Combat Mods (previously called Scourges or Pacts) that can either make battles harder or easier. Each Combat Mod comes with a point modifier—more challenging Mods give more points. By activating more Mods, you can boost your final Run Score and potentially earn better rewards.
Event Schedule and Participation: Breaker Events are held during the first two weeks of each month. For Chapter 1 of Age of Fear, that means the Silver Surfer Breaker Event will be the featured event. There will be four different Difficulty levels, so players at various stages of progression can take part. Anyone who is level 50 or higher is eligible to participate in the Silver Surfer Breaker Event.
Since Chapter 1 of Age of Fear lasts for three months, the Silver Surfer Breaker Event will be active three times—during the first two weeks of each month throughout Chapter 1. After that, we’ll see how the Breaker Event: Silver Surfer continues, as a new Breaker Event will launch with the start of Chapter 2.
Gameplay Tips:
- You can quit and retry any node as many times as you want until you’re satisfied with your result.
- Experiment with different Combat Mods to find the best balance between challenge and reward.
- Aim for a high Run Score by activating more difficult Mods if you can successfully clear the nodes.
This event is a great way to earn Silver Surfer (Breaker) and test your roster in new ways. Good luck!
Breaker Event: Silver Surfer arrives on May 4 at 2:00 PM (PDT).
Unlock
Hit the Breaker Event milestones to earn a variety of rewards, including character shards for Silver Surfer (Breaker)! Try to collect as many shards as possible during the first run of this Breaker Event, as this will give you a strong start for future runs—where you’ll have more chances to earn additional shards and grow your collection.
For players looking to prove they’re the best, the competition goes beyond just finishing the event. During the 2-week event period, you can compete on the leaderboard for top spots and earn valuable rewards like Red Stars, Awakened Abilities, and Diamonds for Silver Surfer (Breaker).
This is the perfect time to put your planning, roster growth, and strategic execution to the test!
How to Unlock Silver Surfer (Breaker) in the Breaker Event
- 1 Yellow Star:
- Reach Milestone 2
- Play on Difficulty 1
- For safety, activate a couple of easy Mods (e.g., enemy Armor increase), but most likely you will not need any
- 2 Yellow Stars:
- Reach Milestone 5
- Play on Difficulty 3
- No Mods activated
- 3 Yellow Stars:
- Reach Milestone 6
- Play on Difficulty 3
- Activate three enemy Armor increase Mods
- 4 Yellow Stars:
- Reach Milestone 7
- Play on Difficulty 3
- Activate several Mods (more than for 3 stars)
- 5 Yellow Stars:
- Reach Milestone 8
- Play on Difficulty 4
- Activate only the Unrattled III Mod (Enemies gain +50% Armor)
- Complete 9 missions (the 10th is not needed)
- 6 Yellow Stars:
- Reach Milestone 9
- Play on Difficulty 4
- Activate Unrattled II and Unrattled III Mods
- Complete 9 missions
- 7 Yellow Stars:
- Reach Milestone 10
- Play on Difficulty 4
- Activate Unrattled I, II, and III Mods
- Complete 9 missions
This breakdown should help you plan exactly what you need to do for each milestone and star level. Good luck!
Requirements
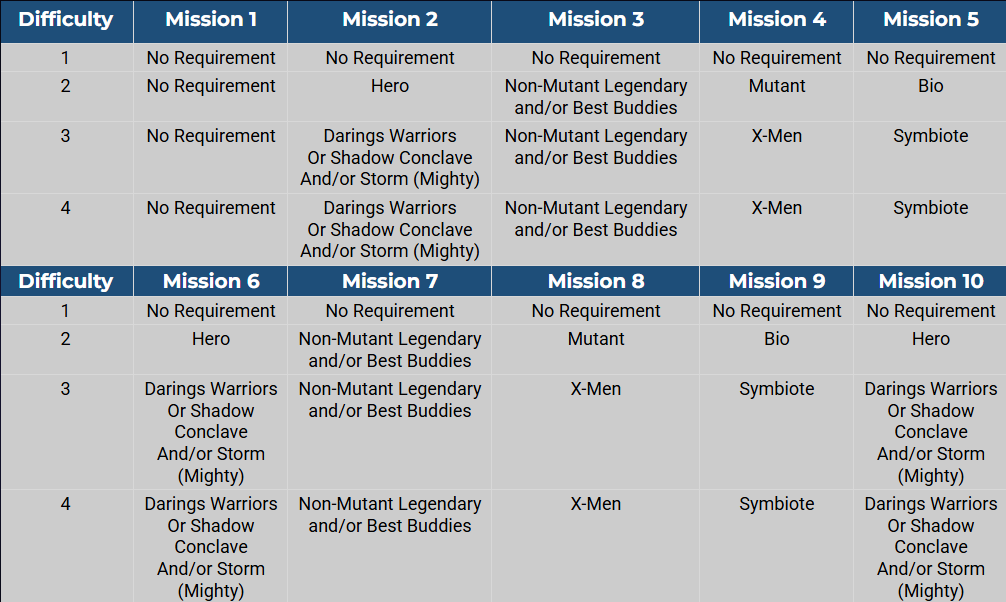
As you can see, there are no requirements for Difficulty 1. This means that players who choose to play on Difficulty 1 can use any characters from their roster and complete all 10 missions with whichever team they prefer.
Difficulty 2 introduces specific requirements for certain missions. Here’s what you need to know:
- Mission 1: No requirements—use any characters you want.
- Missions 2, 6, and 10: You must use Hero characters.
- Missions 3 and 7: Only non-Legendary Mutant characters and/or Best Buddies are allowed.
- Missions 4 and 8: Only X-Men characters are permitted.
- Missions 5 and 9: You must use Symbiote characters.
Difficulties 3 and 4 will require players to use specific characters or teams in missions 2, 6, and 10:
- Mission 1: No requirements—use any characters you want.
- Missions 2, 6, and 10: You must use Daring Warrior or Shadow Conclave and/or Storm (Mighty).
- Missions 3 and 7: Only non-Legendary Mutant characters and/or Best Buddies are allowed.
- Missions 4 and 8: Only X-Men characters are permitted.
- Missions 5 and 9: You must use Symbiote characters.
Combat Mods
Two always active Mods:
- Fitting In
- Ally Storm (Mighty) gains the same Daring Warrior effects and benefits when joining Daring Warrior allies
- Forged in Fire
- All Cosmic Crucible abilities are active during this run
List of Combat Mods for the Breaker Event: Silver Surfer:
- Experimental Serum I
- Enemies gain +10% Max Health
- Experimental Serum II
- Enemies gain +20% Max Health
- Whole Latte Power
- Enemies generate 1 additional Ability Energy each time they generate Ability Energy
- Up The Ante
- All enemy Special and Ultimate abilities have a reduced energy cost of -1
- Blinded by Power
- When a player character uses their Ultimate, they gain Blind
- Experimental Serum III
- Enemies gain +30% Max Health
- Warp World
- When any character drops to 50% Health, characters on the opposing side flip negative status effects to positive, and their allied characters flip positive status effects to negative
- Vile Rally
- On enemy death, clear all negative effects from enemies
- Hold’em
- When a player character uses their Special, they gain Ability Block
- Getting Angry
- On enemy Death, all enemies gain 2 Ability Energy
- World at War
- All War abilities are active during this run
- Indestructible Mind
- Enemies immune to Trauma
- Inner Rage I
- Enemies gain +20% Damage
- Unrattled I
- Enemies gain +20% Armor
- Inner Rage II
- Enemies gain +30% Damage
- Unrattled II
- Enemies gain +30% Armor
- Adrenaline Rush
- On kill, fill adjacent enemies Speed Bar by 20%
- Replenished Darkness
- On enemy Death, all enemies are healed for 25% of their Max Health
- Inner Rage III
- Enemies gain +50% Damage
- Unrattled III
- Enemies gain +50% Armor
As you saw in the Unlock section, most of the Mods in this event are not actually required to unlock Silver Surfer (Breaker) or to collect more of his Yellow Stars. The key is to play on the highest difficulty (Difficulty 4) with the Unrattled Mods activated. You only need to use the other Mods if you want to achieve a higher score and move up the Leaderboard.
Players who finish in the top 100 of this Breaker Event can expect to receive one or more Diamonds for Silver Surfer (Breaker), along with 7 Red Stars. Anyone who finishes in the top 500 will also get 7 Red Stars. So, if your goal is to be among the best, focus on maximizing your score by enabling more challenging Mods. But if you just want to unlock Silver Surfer (Breaker), stick to the main requirements mentioned earlier.
Breaker Event: Silver Surfer Walkthrough and Video
You can view our Walkthrough of this Breaker Event on YouTube. Below you can also find descriptions of strategies used to defeat each node.
Before each mission, you can find suggested teams or characters in the “Suggested Teams” section. We completed the missions using the first team we recommend, and the walkthrough is based on that team’s playthrough. However, it is also possible to complete the missions with the other teams or characters mentioned in the Suggested Teams section (in some cases, such as Mission 1, it may even be easier).
Video Guide
Mission 1 (No requirements)
Suggested team: Daring Warrior (no Jessica Jones) + Odin OR Odin + Knull + Mephisto + Blastaar + Thunderstrike / Sentry
Walkthrough:
This is definitely not an easy mission (especially on Difficulty 4), because the Starjammer characters you face (Havok, Lilandra, and Howard the Duck) are incredibly strong. Havok’s pins can be especially tricky, as they constantly deal passive damage to your team. That’s exactly why we bring Odin—to make this mission as smooth as possible.
Do not use Night Thrasher’s Ultimate at any point in this mission, since it will remove Odin’s Battlefield Effect from the enemy side. At the start of the battle, there’s no need to hold back your abilities; focus all your efforts on eliminating Havok, Lilandra, and Howard the Duck first. Once those three are down, the rest of the mission becomes much easier.
In the second wave, you’ll face Masters of Evil and Cabal characters. Here, you should start saving your ability cooldowns with your Daring Warrior characters. Odin’s Battlefield Effect will be a big help in defeating your opponents.
Focus on taking down The Leader and Iron Patriot first, then deal with the rest. Be sure to save your cooldowns for Mission 2, where you’ll also need your Daring Warrior team. Your Eclipse can be Healer (Iso-8 Class), because she is a fast character who will play often, and as a Healer, she can massively increase your sustain.
Mission 2 (Daring Warrior or Shadow Conclave and/or Storm (Mighty))
Suggested team: Darring Warrior OR Daring Warrior (no Daredevil or Jessica Jones) + Storm (Mighty)
Walkthrough:
At the start of this mission, you’ll face Sinister Six enemies, so it’s important to have Eclipse’s Special ability ready. Use it to target Kraven—this will apply Silence and Disrupt to him and to nearby enemies. The Special also gives Eclipse the New Moon buff, which passively applies Blind to enemies on their turn. This is extremely useful.
Focus your attacks on Green Goblin (Classic) and Vulture first, then go after Doctor Octopus. Save Night Thrasher’s Ultimate and Speedball’s Special for the second wave—they aren’t needed right away. Once you’ve eliminated the main threats (the three mentioned above), start using only Basic attacks to recharge your Special and Ultimate abilities for the next wave.
When only one enemy from the first wave remains, the second wave will arrive, led by Knull. This is the perfect time to use Speedball’s Special, which provides excellent control with Ability Block. Even more importantly, it gives your team Safeguard, Defense Up, and Speed Up. Try to hit Void Knight with Speedball’s Special. If Eclipse’s Ultimate is ready, use it now to grant Immunity to your whole team. After these buffs, your squad will be in a great position to crush the opposition.
With Jessica, target Hobgoblin, and use Ultimate to remove his Immunity and Offense Up—he’s a very dangerous damage dealer who can wipe out your team on Difficulty 4. Now is the ideal moment to use Night Thrasher’s Ultimate: not only does it remove buffs from enemies, but it also Ability Blocks both Jeff and Gorr. Use Daredevil’s Ultimate as well to inflict massive damage, likely taking out some of the enemies.
At this point, your main focus should be on Superior Spider-Man—try to eliminate him before his turn or Stun him with Speedball’s Ultimate. After Hobgoblin, Jeff, Superior, and Void Knight are defeated, focus on Knull and start building up Ability Energy. Finish off Knull and the remaining enemies (Gorr, Scorpion) using basic attacks.
Mission 3 (non-Legendary Mutant and/or Best Buddies)
Suggested team: New Mutant (no Warlock) + Professor Xavier OR Hellfire Club (no Madelyne Pryor) + Professor Xavier
Walkthrough:
For this mission, we decided to use New Mutant characters (excluding Warlock, since he unfortunately isn’t a Mutant). The Crucible buffs are permanently active in every run, making New Mutants dominant. Instead of Warlock (who is Tech, not Mutant), bring the strongest Mutant in the game—Professor Xavier.
At the start, use Cannonball’s Special, then focus on Oath. You can take her out using basic attacks from Wolfsbane and Sunfire. After that, shift your focus to Agatha and Blade. Don’t use Professor Xavier’s Special just yet. Once Blade and Agatha are eliminated, use only basic attacks with all characters until the second wave of enemies arrives.
When the second wave begins, you can use Professor Xavier’s Special—make sure to target Apocalypse. This will help your team remove any debuffs that Spider-Man (Big Time) likely applied, and Professor’s Special should also eliminate Apocalypse. Your most dangerous opponent now is Emma Frost (X-Men), since both Warlock and Doom are Ability Blocked by Professor Xavier. However, Emma alone shouldn’t pose much of a threat. Take her out next, then finish off the Ability Blocked enemies. And of course, remember to save your Ability Energy for the next mission.
Mission 4 (X-Men)
Suggested team: New Mutant (no Sunfire) + Professor Xavier OR Immortal X-Men (no Polaris and Cable) + Old Man Logan
Walkthrough:
In this mission, Warlock is available because he’s an X-Men, just like the other New Mutants. So, bring the New Mutant team without Sunfire and include Professor Xavier instead.
At the very start of the battle, you should have Professor Xavier’s Ultimate ready—use it right away to deal massive damage to your opponents. Your primary targets should be Ms. Marvel (Classic) and Kahhori. After them, focus on Moon Girl and Medusa.
When the second wave of enemies arrives—mostly Liberty characters—focus your attacks on Peggy Carter, Falcon (Joaquin), and Patriot. Use Wolfsbane’s Special to remove buffs from the enemies. Once you have control of the fight, switch to using only basic attacks and start saving Ability Energy for the next mission.
Mission 5 (Symbiote)
Suggested team: Knull, Gorr, Carnage, Void Knight, Red Goblin / Venom
Walkthrough:
The Symbiote missions are among the easier stages in this Breaker Event. At the start, use Knull’s Special to summon an extra Carnage, and use Void Knight’s Ultimate—make sure to target Spider-Man (Big Time). Your main goal throughout the mission is to keep targeting the weakest enemy, push them into red HP, and thereby fill the Speed Bar of your Knull and both Carnages.
When the second wave arrives, the strategy is similar. Use Red Goblin’s Ultimate here and focus first on your left side, where Lady Bullseye and Iron Fist are located. Try to eliminate these two as quickly as possible—Steel Serpent isn’t a major threat for now. After that, shift your focus to the other Lady Bullseye on the right side of the battlefield. Once you’ve taken down these three, finish off the rest using basic attacks.
Thanks to the passive abilities of the two Carnages, both of them—and Knull—will get turns much more frequently, so eliminating the remaining enemies in this mission should be no problem at all.
Mission 6 (Daring Warrior or Shadow Conclave and/or Storm (Mighty))
Suggested team: Daring Warrior OR Daring Warrior (no Daredevil or Jessica Jones) + Storm (Mighty)
Walkthrough:
For this mission, we’re using the Daring Warrior team again. It’s important to have Eclipse’s Special ready—use it right at the start of the battle. With Night Thrasher, you can use his Ultimate to remove those annoying Evade and Immunity buffs from the enemies.
In the first wave, you’ll be fighting the Accursed team. Your primary target should be Satana, followed by The Hood. Once those two are eliminated, focus on the rest of the Accursed team. They’re not as dangerous in a group of three, so you can start saving abilities for the second wave.
In the second wave, Mephisto appears—he should be your top priority, so try to eliminate him as quickly as possible. After Mephisto, focus on Satana, then Blade, and finally Oath. Feel free to use your abilities until Mephisto and Satana are defeated. Once they’re down, gradually start saving your abilities for Mission 10, where you’ll need your Daring Warrior team again.
A very important tip: after Mission 6, make sure you have the following abilities ready to use—Eclipse’s Special, Jessica Jones’s Special, Daredevil’s Ultimate, Night Thrasher’s Ultimate, and Speedball’s Special.
Mission 7 (non-Legendary Mutant and/or Best Buddies)
Suggested team: New Mutant (no Warlock) + Professor Xavier
Walkthrough:
At the start of this mission, you’ll face the Fantastic Four (MCU) characters and Nightcrawler. If you have Cannonball’s Special ready, use it immediately—this will Blind all enemies and Stun Mister Fantastic (MCU). Invisible Woman will miss her Ultimate because it’s not Unavoidable, and she’ll be Blinded, but unfortunately, Franklin will still deal damage with his Ultimate and apply his Battlefield Effect to your side of the field.
Your primary target should be Franklin. After him, focus on Invisible Woman (MCU) and Nightcrawler. Human Torch and The Thing will likely be taken out by splash damage, so leave Mister Fantastic (MCU) for last. With Professor Xavier, use his Special and include Franklin Richards as one of the targets to apply Ability Block to him.
In the second wave, you’ll face Quasar, Phantom Rider, Yo-Yo, Nico Minoru, Gwenpool, and a few more opponents. This wave can be tricky if War rules are active, but if they aren’t (and they shouldn’t be), you shouldn’t have major issues dealing with these opponents. Focus on Quasar first, then Phantom Rider, followed by Yo-Yo and Gwenpool, then everyone else. Remember to save Ability Energy for the next mission, as you’ll be using the New Mutants and Professor Xavier again.
Mission 8 (X-Men)
Suggested team: New Mutant (no Sunfire) + Professor Xavier OR Immortal X-Men
Walkthrough:
It’s ideal if you have Professor Xavier’s Special ready at the start of this mission, since Hellcat will apply a lot of nasty debuffs to your entire team. Use Xavier’s Special immediately to clear those debuffs, then focus on eliminating Living Mummy first, followed by Agatha. The order for the remaining three enemies isn’t as important. If possible, finish off Living Mummy with Wolfsbane’s Ultimate to prevent him from reviving.
In the second wave, Apocalypse arrives with his Horsemen, along with Hulk, Brawn, and Wong. After this mission, you won’t need the New Mutants or Professor Xavier anymore, so don’t hold back—use all your cooldowns and strongest abilities. Professor Xavier’s Ultimate will deal massive damage. Focus your attacks on Apocalypse, Morgan Le Fay, and Rogue first, then take out Red Hulk.
Mission 9 (Symbiote)
Suggested team: Knull, Gorr, Carnage, Void Knight, Red Goblin / Venom
Walkthrough:
At the start of this mission, you’ll face a mix of Absolute A-Force and Underworld teams. Focus on the Underworld characters first—they’re much easier to push into red HP, which will help fill the Speed Bar for Knull and both Carnages. (And of course, open the fight with Knull’s Special.) Once you’ve eliminated the low-HP enemies, you’ll have enough Speed Bar to take out Kahhori and Medusa before they get a turn.
In the second wave, you’ll be up against the Annihilators, along with Minn-Erva, Dormammu, and Doom. If possible, try to make sure Knull delivers the final blow to enemies, since that will prevent them from being revived. There’s no need to save your cooldowns in this mission, as you won’t be using Knull or the other Symbiotes after this. Use every ability you have—Gladiator will be your primary target because of his Taunt, but once you get him into red HP, his Taunt will drop, and he’ll gain Stealth, opening up the rest of the enemy team.
This mission isn’t especially difficult, but be careful with Thanos (Endgame)—make sure he has plenty of debuffs (especially Trauma) before you drop him below half HP. Prioritize taking down Minn-Erva, Thanos, Dormammu, and Doom first, then clean up the rest of the enemies.
Mission 10 (Daring Warrior or Shadow Conclave and/or Storm (Mighty))
Suggested team: Daring Warrior OR Daring Warrior (no Daredevil or Jessica Jones) + Storm (Mighty)
Walkthrough:
Mission 10 is very difficult and requires smart play. Every mistake can be costly, especially on Difficulty 4, and if you activate additional Armor for all enemies.
At the very start, you face Blue Marvel, two Illuminati characters, the Living Mummy, and Black Cat. Your primary target should be Blue Marvel, followed by Hank Pym. It’s crucial to have Eclipse’s Special ready and to start the battle with all your characters’ HP nearly full. Use Eclipse’s Special immediately—this will remove negative effects, especially the Stun applied by Black Cat, and heal any damage caused by Blue Marvel.
Then, use Night Thrasher’s Ultimate right away to remove positive buffs from the enemies. Daredevil’s Ultimate can also be used immediately. With Speedball, attack Blue Marvel with his Ultimate, but save his Special for later. The key is Jessica Jones and her Special—use it as often as possible, whenever you can, to provide extra Ability Energy to your allies. If you have the chance to use Eclipse’s Special again during the first wave, do so, as it will generate more Ability Energy for the whole team.
After you eliminate Blue Marvel, Hank Pym becomes your next priority. Under no circumstances should the second wave of enemies arrive while Hank Pym is still alive. The second wave will appear when only one enemy from the first wave remains, and ideally, that last one should be left with low HP. Another important tip: before the end of the first wave, use Speedball’s Special—this will give your whole team Speed Up, giving you an extra advantage when the second wave appears.
To summarize:
- In the first wave, focus on Blue Marvel and then Hank Pym.
- Use all abilities immediately except for Speedball’s Special, which you should save for later.
- Use Jessica Jones’s Special (and Eclipse’s Special) as often as possible to generate Ability Energy. The goal is to have the Ultimates with Night Thrasher and Daredevil ready for the second wave of enemies.
In the second wave, you’ll face Odin, Knull, Blastaar, Thunderstrike, The Leader, Namor, and of course, another Hank Pym (the most annoying enemy ever). It’s important for your team to have Speed Up, so you’ll start with a significant turn advantage—make sure to use this wisely.
Your main target is essentially Odin, but you can’t let Hank Pym heal him. Ideally, you want to eliminate Hank Pym first, then go for Odin. Use Daredevil’s Ultimate (he should be equipped as a Raider to maximize his AoE damage), Night Thrasher should have his Ultimate ready or be really close to using it again. If he has Ultimate, ready use it; if not, use Special or Basic and target Hank Pym. With Speedball (who should be a Striker), focus on Hank Pym if Hank has Vulnerable (and he should have it after Daredevil’s and Night Thrasher’s attacks – they both should be Raiders). After your characters each take a turn, Hank Pym should be eliminated, making him your true primary target at the start.
If everything goes according to plan, Odin will have Slow and about half HP left, and your team will get another round of turns (thanks to Speed Up) before Odin can play. This should be enough to finish him off as well.
Once Odin is down, the battle is nearly won—the remaining enemies won’t be able to threaten your team. Focus next on Knull, then Thunderstrike. Don’t hold back any abilities, since this is the final mission of the Breaker Event.
This mission is tough and engaging, but it can also be exhausting and frustrating. Don’t hesitate to reset and try several times again, until you get comfortable with the timing and know exactly what to do at each moment.
Conclusion
Most of our testing was done on Difficulty 4 of the Breaker Event, but the strategies we recommend should work well across all difficulty levels. The Daring Warrior and Shadow Conclave teams are definitely the crucial teams for this Breaker Event. However, teams like New Mutant, Symbiote characters, and Professor Xavier are also very valuable, so it’s a good idea to focus on upgrading these teams as well.
To collect all the Milestones—and therefore get 7 Yellow Stars for Silver Surfer (Breaker)—you do not need to have or use the Shadow Conclave team in this Breaker Event. Even the upcoming character, Storm (Mighty), is not required. However, you do need very strong Daring Warrior and New Mutant teams, along with Professor Xavier. A powerful Knull is also necessary, while his Symbiote allies don’t need to be maxed out (they don’t need GT20 or level 110), but they should still be decently strong (around level 100 at least).
Basically, for this Breaker Event, if you want 7 Yellow Silver Surfer (Breaker), you’ll need all 5 Daring Warrior characters, all 5 New Mutants, Knull, and 4 Symbiotes, plus Professor Xavier. Odin is also a nice bonus for Mission 1. That’s a total of 16 or 17 characters for all 10 missions, which isn’t a huge number overall.
We hope our tips and guidance will make it even easier for you to add Silver Surfer (Breaker) to your roster. If you have any questions or suggestions, the best way to reach us is through our Discord server:
Good luck and have fun!
