

Battleworld: The Abyss
Intro
Battleworld will return on February 18th, with some notable changes. The most significant change is that it will now be a monthly game mode, occurring once a month and lasting for four days. The first three days will feature standard zones, while the fourth day will be dedicated to the Knull Boss Battle. Currently, Spec Ops have been removed from Battleworld, but they may return in the future. Each zone will include three missions: the Elite Mission, which requires either an Astral team or a secondary team; the Herald Mission; and the Standard Mission.
Each new difficulty will unlock once the alliance reaches a certain Victory Points threshold, new difficulties should also have First-time rewards.
Mission Types
Battleworld lasts for 4 days (4 Zones, one per day). Each character can only be used once per day. The timer on all battles is set to 6 Minutes, but the countdown only keeps going when character animations play, so if you stop to think during the battle while it’s your turn, the timer will also freeze until you use an ability.
The first 3 days will entail a mix of one Standard, one Elite, and one Herald Mission, while the last day will be the Boss Battle skirmish.
Boss Battle – will occur during the last day of Battleworld (day 4). Players will have 3 attempts to deal as much damage to the Boss as possible. All the damage from all Alliance members will then be tallied up, and if that is enough to eliminate the Boss, all players will earn additional rewards (Knull character shards).
Knull has a limit on how much damage he can take per turn, so abilities like Mephisto’s Basic Pact or Apocalypse’s Empowered Basic will not deal percentile-based damage. For example – on difficulty 5, Knull can only take 4 million damage per turn, so Mephisto’s Basic Pact will only deal 4 million and won’t clear half of his Health Bar. Additionally, Knull is immune to Ability Block, Exhausted, Exposed, and Stun; his Speed Bar also cannot be reduced. So controlling him will be a challenge
If you don’t defeat the boss, you will earn less of his Character Shards, depending on how much Health he has left, and you will earn other rewards depending on how much damage was dealt to him (rewards like Battleworld currency, Purple Ions, etc.)
Once the Boss is defeated, he will revive at full Health (but he will lose other bonuses he might have, like Rage, etc.). Defeating the boss after this point won’t increase the rewards but will allow you to earn more Season Points to get a better Leaderboard Rank.
Missions:
Standard missions will require players to battle through 5 waves of enemies (a total of 20 enemies) to clear the node and gain VP (victory points).
Herald missions are mini-boss missions where players face off against a strong mini-boss and his team. This will be a single-wave battle.
Elite missions will be missions where you can use Battleworld specialized teams.
Players get 3 attempts for each of the missions. Every mission also has a Trait requirement and a bonus requirement (ex., we can use City characters for Zone 1/Mission 1, but we get Bonus VP for using Superior Six).
All Missions will also have combat modifiers to bolster your opponents prowess. Sometimes the modifiers will affect all characters in the battlefield, both ours and the opponent’s, but mostly only the opponent’s. These modifiers will include general bonuses as well as character/team/Iso-8 Class/Traits – specific ones.
Requirements and Rules
Zone 1 (day 1)
Standard Mission – Global&Hero
- Combat Mods:
- Unstopable Force:
- On an enemy Striker’s Turn, flip Offense Down on that character + Barrier that character for 5% of that character’s Max Health.
- Unstopable Force:
Herald Mission – Global&Villain
- Combat Mods:
- Danger Zone:
- Enemy characters gain +200% Damage and Armor while below 50% Max Health
- Wrecking Ball:
- On Turn, if a character has Taunt, Gain Offense Up
- On Turn, all allies with Offense Up gain Assist
- Empowered Necrosword:
- Enemy Gorr will Act First and has +300% critical hit damage
- Danger Zone:
Elite Mission – Astral or Spider-Society
- Combat Mods:
- Vanguard:
- While an enemy character has Taunt, all other enemies gain 15,000 Armor
- When it Rains:
- When a positive effect is applied to an enemy character, increase the duration of all positive effects on that enemy by 1 (up to a max of 3)
- Vanguard:
Zone 2 – day 2
Standard Mission – City&Villain
- Combat Mods:
- Butterfly Effect:
- When a Fortifier character uses an Ultimate Ability, spread positive effects on that character except for Regeneration to adjacent allied characters
- Dark Resolve II:
- On enemy death, enemies gain Immunity and Regeneration
- Weakened:
- Player character healing is reduced by 20%
- Butterfly Effect:
Herald Mission – City&Hero
- Combat Mods:
- Safeguarding Justice:
- On Spawn, Vigilante characters gain Safeguard for 4 turns
- Safeguarding Justice:
Elite Mission – Astral or X-Treme X-Men
- Combat Mods:
- When It Rains:
- When a positive effect is applied to an enemy character, increase the duration of all positive effects on that enemy by 1 (up to a max of 3)
- Unstoppable Force:
- On an enemy Striker’s Turn, flip Offense Down on that character + Barrier that character for 5% of that character’s Max Health.
- Vanguard:
- While an enemy character has Taunt, all other enemies gain 15,000 Armor
- When It Rains:
Zone 3 – day 3
Standard Mission – Cosmic&Hero
- Combat Mods:
- Weakened:
- Player character healing is reduced by 20%
- Throne Defenders:
- When an enemy uses their Basic attack, they apply Bleed to the primary target
- When an enemy uses their Special Ability, they apply Heal Block to the primary target
- When an enemy uses their Ultimate Ability, they apply Blind to the primary target
- Dark Resolve II:
- On enemy death, enemies gain Immunity and Regeneration
- Weakened:
Herald Mission – Cosmic&Villain
- Combat Mods:
- Throne Defenders:
- When an enemy uses their Basic attack, they apply Bleed to the primary target
- When an enemy uses their Special Ability, they apply Heal Block to the primary target
- When an enemy uses their Ultimate Ability, they apply Blind to the primary target
- Breaking Barrier:
- All characters gain +50% Max Barrier
- On Spawn, Barrier self for 100% of that character’s Max Health
- Gin +100% Damage
- On ally Death, Barrier self for 100% of that character’s Max Health
- Vampire Hordes:
- When a vampire minion is defeated, a replacement minion spawns until 5 of that minion have been defeated
- Each successive minion is stronger than the last
- Each minion type cleared awards a small VP bonus
- Defeating Oath immediately triggers victory
- Throne Defenders:
Elite Mission – Astral or Spider-Society
- Combat Mods:
- Vanguard:
- While an enemy character has Taunt, all other enemies gain 15,000 Armor
- Throne Defenders:
- When an enemy uses their Basic attack, they apply Bleed to the primary target
- When an enemy uses their Special Ability, they apply Heal Block to the primary target
- When an enemy uses their Ultimate Ability, they apply Blind to the primary target
- Vanguard:
Zone 4 – day 4
Knull’s Throne
- Combat Mods:
- Boss Immunities:
- Knull is immune to the following: Ability Block, Exhausted, Exposed, and Stun
- Boss Resistances:
- No single attack can inflict over 3% of a boss’ Maximum Health. In addition, damage caused by Bleed, stolen Health, or attacks based on the boss’ Maximum Health, can’t exceed 3% of that boss’ Maximum Health
- God of Symbiotes:
- Knull can summon Symbiote allies
- Eternal Darkness:
- Knull can inflict Darkness which Mind Controls the afflicted character
- Void King’s Rage:
- For each Rage Knull has, he gains 10% Damage and Speed, in addition to other effects
- Boss Immunities:
The most significant change regarding Knull is that Bleed damage will no longer exceed the maximum damage he can receive from a single attack. As a result, the previous strategies involving characters that inflict multiple Bleed effects will be considerably less effective.
Characters can be revived if they are not killed directly by Knull. This means that if they die due to one of Knull’s Symbiote summons or are defeated by an ally while under Knull’s mind control, they can still be revived. However, if Knull is the direct cause of their death, they cannot be revived.
Rewards
There are plenty of rewards players can get from Battleworld, including rewards for completing missions, daily rewards, Boss Battle rewards, monthly rewards, and season Leaderboard rewards.
- Boss Battle rewards will include Knull character shards, Purple Ions, Blue Lvl 4&5 Ions, and Battleworld Currency.
- Season Leaderboard rewards will include Purple Ions, Blue lvl 4&5 Ions, Basic Purple Iso-8 Orbs, and Diamonds for specific characters (potentially only during the first few seasons)
- Monthly rewards will include Battleworld currency, Purple Iso-8 Credits, and Blue Iso-8 Credits. Weekly rewards will be based on how many Victory Points can your alliance get.
- Daily rewards will include Battleworld credits for completing missions.
Due to the major changes impacting the Battleworld game mode, which is now a monthly event instead of a weekly one, the number of Knull Shards available from rewards has increased.
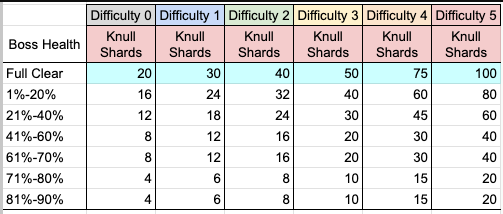
The difficulty level we will begin with is based on what our Alliance established during the first iteration of Battleworld (prior to the break).
Missions Guide/Walkthrough
All missions have a specific team/trait that can provide Bonus Points if used, and that team should always be our primary option. But since all characters can only be used once per day and we have 3 attempts per mission, it doesn’t hurt to have some backup options for the other 2 attacks.
The goal is to clear the Missions first since that will give out more Victory Points than Spec-Ops missions. Some characters can also be required for both Spec-Ops and normal missions, so we have to choose carefully. Once we have cleared the normal missions or used all of the attempts, we can then proceed to deploy the remaining characters to Spec-Op missions.
Standard and Elite missions will have bunch of enemies separated into multiplie waves, and the Herald mission will only have 1 wave, but it will include a strong boss character. Due to combat modifiers, if the required team is built up high, it should be possible to one-shot these missions. That goes even more true for lower difficulties.
This section will be slowly updated to include the best strategies and alternative teams to use for each mission.
This walkthrough has been tested at Difficulty 5 and is also applicable to all lower difficulties.
Zone 1 Walkthrough
Standard Mission – Global&Hero
We have a large selection of Global and Hero Characters that we can use in this mission. We decided on Old Man Logan (of course – who wouldn’t) and with him, Black Knight to protect and counter, Hunk Pym to heal, and Immortal X-Men duo Jean Grey and Storm. If you don’t have a strong enough Jean, you can bring Nightcrawler or Phoenix, either one will fit this team very well. Of the new teams, the entire Liberty and Uncanny Avenger teams are made up of Global Hero Characters, so you can lead them as well, to get additional synergy.
In the first wave, it’s crucial to remove the Taunt from Absorbing Man. After that, focus on controlling Kang and targeting Red Goblin. Everything else should go smoothly. Save Storm’s Ultimate for Wave 3.
Wave 2 has a similar strategy. First, eliminate the Taunt from Absorbing Man, then control Gorr, as he can take down all Charged from Storm and Black Knight. Once you get Thanos (Endgame) below 50%, sustain his passive, and everything should be fine after that.
When Wave 3 starts, Storm should ideally have 20 Charged. Use her Ultimate on opponents, and that should wrap things up. Old Man Logan is excellent for this Mission because he causes significant disruption to the enemies. Hank is also valuable due to his positive impact on team sustainability.
Herald Mission – Global&Villain
The ideal team for this mission consists of Orchis (without Sentinel) and Apocalypse. We’ll exclude Sentinel because his minions can be easily killed or reduced to low HP, which would trigger Carnage’s Passive ability, allowing opponents to gain a significant increase in their Speed Bar.
At the start of the battle, Gorr will attack Apocalypse using his special move. With a bit of luck, Apocalypse will resist Gorr’s Charged clearing and will be able to counterattack, stunning enemy Gorr in the process. Afterward, Apocalypse should use his empowered basic attack to eliminate Red Goblin, then target Carnage, and finally the rest of the opposing team. It’s advisable to leave Venom for last. With level 100 Orchis characters, this team will be more than capable of defeating the opponents without any difficulties.
Elite Mission – Astral or Spider-Society
Astral is logically a much better choice for this mission. In the first wave, you need to control or eliminate Spider-Weaver and Red Hulk. The opponent’s Lizard goes first and applies Taunt on itself, but you can easily counter that with Emma Frost’s (X-Men) Special. Use Shadow King’s Special to target Spider-Weaver next. After taking care of Spider-Weaver, focus on Red Hulk, and remember to save your cooldowns for the second wave.
When the second wave begins, the opposing Spider-Weaver will have one Charged, causing your first attack to miss. Focus your efforts on her to prevent her from taking any action and apply additional Charges on herself. Green Goblin (Classic) is your next target. Once you eliminate these two, the rest should be easily manageable. Shadow King’s Ultimate performs exceptionally well in this wave. Astral has strong sustain and ability energy generation, so you don’t need to worry; you’ll have all the abilities you need for the final wave. Passively, you’ll likely eliminate one or two more enemies before taking down the two primary targets, after which you can finish off the remaining foes.
In the last Wave, the opponent’s Spider-Weaver spawns with 3 Charged, and Green Goblin (Classic) starts with 10. However, this should not pose a significant challenge for you. Use Moondragon’s Special regardless of whether it misses, as it will apply Immunity to your entire team, preventing opponents from applying numerous debuffs or crowd control. The priority for elimination should be: Spider-Weaver, Red Hulk, Green Goblin (Classic), followed by the remaining enemies. With Doctor Strange’s Special, you can flip many buffs on the opponents (excluding Superior Six, which will have Safeguard). A Level 100 Astral team should have no trouble clearing this Mission.
Video Walkthrough for Zone 1
Zone 2 Walkthrough
Standard Mission – City&Villain
The best choice for this mission is the Superior/Sinister Six team, consisting of Green Goblin (Classic), Doctor Octopus, Lizard, Vulture, and Mysterio. We have a speed advantage over our opponents, making Combat Modes have minimal impact.
At the beginning of the fight, use Vulture’s Special to slow down your left-side opponents (Peter B., Hercules, Gambit). Then, utilize Lizard’s Ultimate to remove all buffs from all opponents. Jean Gray will take her turn, but she won’t pose much of a threat. After her turn, Green Goblin (Classic) will use his Ultimate, giving you a crucial advantage. Later on, Vulture’s Ultimate will further strengthen your position during the match. In the first wave, you won’t need to save too many abilities. With Mysterio, use the Special to apply Blind to all opponents and then finish them off. Gambit’s pinning ability will no longer be effective since he is blinded. Following this strategy in the first Wave should prevent any opponents (except for Jean Gray once) from getting a turn.
In the second Wave, start by targeting Spider-Man (Big Time). Green Goblin (Classic)’s Special is great for removing his Speed Up and Defense Up, while also reducing his Speed Bar slightly. After you’ve slowed down some opponents with Vulture, follow up with Doctor Octopus’s Ultimate. Use Mysterio’s Illusions to attack opponents with buffs, as they will strip those buffs away. Once Big-Time is down, shift your focus to Quicksilver, Penny, and Hercules. Hercules is likely to take a turn, so it’s best to use Mysterio’s Special to Ability Block him. You will also inflict passive damage when Green Goblin (Classic) counters your opponent’s attacks. When there are four or fewer opponents left, rely solely on Basic attacks to fill ability cooldowns.
When the opponents from Wave 3 arrive, Mysterio should use his Ultimate to apply Disrupt on the enemy Rogue, preventing her from passively Taunting. Now, you can use all the abilities that have likely cooled down by this point, giving you another significant advantage. Be aware that you might take more serious damage from Gambit’s pins, especially if you don’t manage to apply Blind to him in time. However, even if he takes out one of your characters, it is unlikely to change the overall outcome. Don’t hold back on using any abilities (there’s no reason to save them), and you will complete this mission with ease.
Herald Mission – City&Hero
This Mission has been updated from its original version. The modifications include changes to the characters and opponents. Now, Vigilante characters gain Safeguard for 4 turns upon spawning, making them the preferred choice. With them, we can utilize Blade and Oath effectively.
At the beginning of the Mission, we need to withstand several attacks from the enemy. However, even if our protector, Daredevil (Modern), is defeated, it’s not the end of the world. When it’s our turn to play, Silver Sable will remove the opponent’s buffs, allowing Blade, Oath, and Punisher to eliminate them. With the Vigilante team, this mission becomes much easier.
Elite Mission – Astral or X-Treme X-Men
Astral effectively overpowers everything in front of them in Battleworld. For the strong Astral team, this mission is relatively easy. The key point to remember is to focus on Old Man Logan when he appears (he shows up twice: once in Wave 2 and again in Wave 3). With Moondragon, use her Special ability whenever possible to provide your team with Immunity, protecting them from debuffs. Shadow King’s Passive Damage is on an exceptional level. Don’t hesitate to use Abilities, as Astral has excellent Ability Energy Sustain. You’ll find that you’ll complete this mission without any issues.
Among all the characters used in Zone 2, only Shadow King is at Level 104; the others are at Level 100. Some characters are Gear Tier 18, while others are Tier 19. Despite this variation, everything was completed without any difficulties. The second day of Battleworld (like the first) is also quite easy.
Video Walkthrough for Zone 2
Zone 3 Walkthrough
Advice: First, try to complete the Elite Mission using 4 Astral characters (without Moondragon) and Penny. If you succeed, you’ll have Moondragon for the Standard Mission. If you are unable to do that, then complete the Elite Mission with a full Astral team and choose a different character for the Standard Mission.
Standard Mission – Cosmic&Hero
If you have Odin, this Mission becomes significantly easier. My best advice for those without Odin is to focus on recruiting him as soon as possible. In addition to Odin, we are using three new Absolute A-Force characters and Moondragon. Yes, Moondragon—this means we will restructure the Astral team and add someone else for their mission to them. Moondragon is valuable because she can enhance the team’s survivability with her healing abilities.
In the first Wave, the primary threats are Scarlet Witch (Zombie) and Blade. Kahhori will take her turn first, but unfortunately, no one can assist to her Basic attack. When it’s Odin’s turn, use his Basic to apply a Battlefield effect on the opponent’s side. With Kahhori, use her Special (don’t save it for the next wave), and then focus on Scarlet Witch (Zombie). It’s crucial that she has Offense Down when her turn comes; otherwise, she could potentially eliminate Ms. Marvel (Classic).
In the second Wave, you need to withstand damage from the Skrulls and Thanos (Endgame). Moondragon will be very helpful with her healing, and it’s important to prepare Kahhori’s and Medusa’s Abilities for wave three. Odin will shoulder most of the burden here. Focus on eliminating the Skrull as quickly as possible and avoid getting Thanos (Endgame) below 50% health if any of your characters are in critical condition. This is an ideal opportunity for Odin to use his Special to heal and buff the entire team and, most importantly, gain Charges. Once you get through the passive damage that Thanos inflicts when he drops below 50% HP, everything else should be much easier.
Mephisto is the toughest opponent in Wave three, so you should aim to deal as much damage to him as possible right from the start. He will hide behind the Taunt of other opponents, but whenever the opportunity arises to hit him with AOE damage, take it. Kahhori’s and Medusa’s Ultimates are perfect for this. Before Mephisto uses his Special, you should aim to reduce his HP below half. By that time, Odin’s Ultimate should be ready, which will help you secure victory. If any character on your team happens to die after Odin uses his Ultimate, it’s not a big deal; you will still complete the mission.
Herald Mission – Cosmic&Villain
Select the following five characters for your mission: Gorr, Gladiator, Thanos (Endgame), Super Skrull, and Mephisto. This mission is straightforward. Your objective is to control Oath and only attack the Vampires. You must eliminate all the Vampires before finishing the mission to earn more Victory Points. Once you have defeated all the Vampires, you can focus on Oath.
One important tip: avoid attacking Oath until all the Vampires are defeated. If you accidentally kill Oath, the fight will end automatically, and you will earn fewer Victory Points. You can do some damage to her, and control her with Stun, but do not focus on Oath before all other enemies are down.
Elite Mission – Astral or Spider-Society
As usual, the Astral team will be the dominant force here. This time, we won’t include the entire Astral roster; instead, we’ll add Penny Parker since we’ve already used Moondragon in the Standard Mission. If Penny happens to get knocked out, Doctor Strange can revive her.
In the first Wave, focus on eliminating Hank Pym as soon as possible to prevent him from healing other hero opponents. After that, the main threats are Gorr and Black Bolt, who can deliver permanent kills. You can control Black Panther (Shuri) by stunning her with Penny Parker’s special ability. Overall, the first wave is straightforward.
In the second Wave, prioritize attacking Apocalypse from the start. It’s crucial to use Ancient One’s special ability to attack opponents, which will grant your entire Astral team a Speed Up buff. Penny may be taken out due to counterattacks, but there’s no need to worry; you can revive her later. You shouldn’t hold back on using your cooldowns with Astral characters since they rapidly restore them. It’s best to leave Gladiator as your last target due to his great sustain, allowing you time to resurrect Penny if needed and prepare for the final wave.
The third Wave is easier than the second since there’s no Gladiator to protect other opponents with Taunt. Focus your efforts on Apocalypse, use all your Abilities, and maintain control of the fight until the very end. It’s not too difficult.
Note: Instead of Moondragon in the Standard Mission, you can opt to bring someone else, like Vahl or Groot. This way, your Astral lineup for the Elite Mission will be complete. This adjustment will lead to a somewhat easier Elite Mission while making the Standard Mission a bit more challenging. Ultimately, you will be able to complete both missions without many problems, regardless of your choice.
Video Walkthrough for Zone 3
Zone 4 Walkthrough
Knull’s Throne
Overall, Knull is a bit disappointing. Any active Alliance should be able to defeat him at least once, without almost any effort, to collect the most valuable rewards.
The first team to attack Knull is Astral. This team can reduce Knull’s Health by about 20%. Depending on your investment in Astral characters, you could possibly take off up to 30% of his Health. There’s no special strategy needed; just play the game, don’t hold back on cooldowns, and ensure you maintain the majority of buffs at all times. A well-invested Astral team can consistently take at least 20% of Knull’s health on Difficulty 5, which is enough to complete this Battleworld Boss successfully. After five members of the Alliance use the Astral team to attack, you will defeat him once, allowing you to collect the most valuable rewards, including the important 100 Character Shards for Knull.
Another team you can use to attack Knull is a combination of strong characters: Mephisto, Odin, Thanos (Endgame), Kahhori, and Black Knight. This combination can reduce Knull’s health by about 10%. No special tips are needed; just make sure to apply the Battlefield effect with Odin and avoid using Mephisto’s Special. With the other three characters, focus on dealing as much damage as possible. If you’re aiming for the maximum score, this team can take down up to 15% of Knull’s health, but it’s probably not worth the hassle of restarting the battle multiple times searching for the perfect RNG.
The third and final team consists of three new Spider-Society characters (Peter B. Parker, Penny Parker, and Spider-Man (Pavitr)), along with Old Man Logan and Nightcrawler. This team can consistently apply Slow to Knull while filling their Speed Bar and gaining Speed Up. They have excellent sustain and mitigation, allowing them to deal solid damage, making them a great choice for the Knull fight. They can also take down around 10% of Knull’s health. However, it’s important not to use Old Man Logan’s Ultimate until Knull has a Barrier.
In each of these three fights, your primary target should always be Knull. Only use area-of-effect attacks against the Symbiote characters he summons, and do not target them specifically.
Overall, these three teams are solid choices, and over time, we will likely discover more interesting character combinations that can successfully take on Knull in the Boss Battle.
Vigilante is a strong team to use against Knull. They offer great damage mitigation, impressive damage output, and multiple characters capable of clearing Barrier with their Abilities, such as Punisher’s Ultimate, Silver Sable’s Ultimate, and Elektra’s Ultimate. These abilities make them an excellent choice for battling Knull. With strategic gameplay, you can significantly reduce a solid portion of his Health.
Knull, Odin, Mephisto, Black Knight, and Kahhori make a strong team capable of effectively dealing with the Knull Boss. This team excels in mitigation, as Mephisto’s Battlefield Effect enhances their ability to sustain. Odin, on his own, has excellent sustain and can survive for a long time. Meanwhile, the others benefit from the Drain effect provided by Mephisto’s Battlefield Effect, allowing them to endure as well. Black Knight’s counterattacks can remove Barriers, and combined with the damage from the rest of the team, they form a solid choice for battling the Knull Boss.
Video Walkthrough for Knull’s Throne
Conclusion
All of these changes will significantly enhance the gameplay of Battleworld. The Missions will be challenging and will require players to carefully strategize and choose the right characters to use. In our opinion, this is a far superior iteration of this game mod compared to the original.
Opponents, especially on the highest difficulty settings, are quite formidable, and the Combat Mods add an extra layer of challenge. Therefore, it is crucial to select the right character for each mission every day. We wish you good luck and patience as you work towards unlocking Knull as soon as possible.
If you have any questions about Battleworld or need any help with MSF feel free to reach out to us via our Discord:
