
Battleworld: Dystopia
Intro
Prepare to take on a new challenge as Battleworld’s next continent opens up. This update brings major changes, including fresh missions and one of the biggest improvements to the mode so far.
Battleworld Continent 3: Dystopia launches on June 9th. Alliances will enter Maestro’s harsh territory for a brand-new battle across the map. Here’s what you can expect from this update:
- Perks are a new personal progression feature in Battleworld. They give you temporary boosts as you play through a continent.
- The more you participate, the more Perks you unlock—making missions easier, strengthening your heroes, and letting you progress further into each zone.
- Perks also enhance your attacks against the Boss, giving active players a better shot at earning more Boss character shards.
- Your individual progress benefits your entire Alliance, helping everyone take down the Boss and earn improved group rewards.
- The Boss of Dystopia is Maestro—ready to crush anyone who dares to challenge him.
Perks System
As you progress through a Battleworld Continent, you’ll unlock temporary bonuses called Perks. These Perks strengthen your roster and help you advance further in each fight. Once unlocked, Perks last for the entire duration of a Battleworld Continent and can give you a real advantage—helping you get through Missions, power up your characters, and hit Bosses harder.
The more active you are in Battleworld, the more Perks you’ll unlock. This not only boosts your own strength, but also improves your Alliance’s chances of success and increases your odds of earning valuable Boss character shards. Perks also provide both short-term and long-term goals to work toward during each 4-day Siege, giving you more ways to chase rewards.
There are several kinds of Perks you can unlock:
- Some Perks, like Combat Mods, give your characters special buffs during Missions. These bonuses help you defeat tougher enemies, survive longer, and push farther into each zone.
- Other Perks unlock new Missions that were previously unavailable, offering fresh challenges and more opportunities to help your Alliance.
- Boss Mods are a particularly important type of Perk. These modify the Boss fight itself and become even more powerful as you upgrade them. In Continent 3, these will be crucial for dealing with Maestro, giving you a better chance at taking him down and earning better rewards for your Alliance.
Perks are designed to reward players who actively participate. By clearing more Missions, investing in important characters, and collecting items like Elite Keys and Power Tokens, you’ll keep unlocking new Perks and growing stronger over time. This makes it easier to face tougher enemies, perform better against Bosses, and increase your haul of Boss character shards. Stronger individual attacks also help your whole Alliance defeat the Boss faster and claim better rewards as a team.
Overall, Perks create a clear path for progression: play Battleworld, clear Missions, earn progress, unlock Perks, become stronger, and face bigger challenges. Even if your Alliance isn’t the most coordinated, Perks give everyone clear goals and steady progress throughout each Continent. So, whether you’re part of a top team or just starting out, your personal progress keeps moving forward and helps your group in every battle.
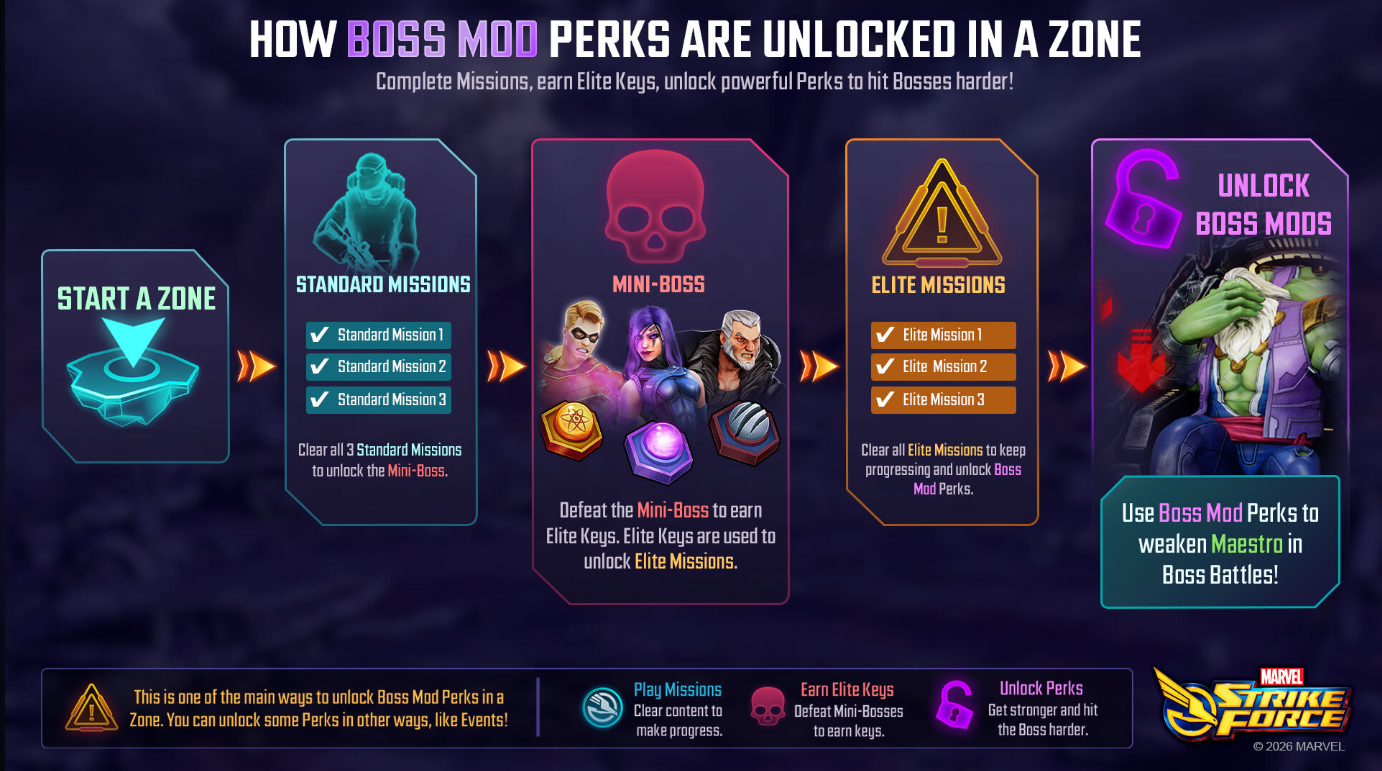
You can earn Perk progress in several ways—by completing standard Missions, fighting enemies, collecting Elite Keys from Mini-Bosses to unlock Elite Missions, and grabbing Power Tokens from special limited-time opportunities. Every bit of participation helps you and your Alliance get stronger.
Mission Types
Battleworld lasts for 4 days (4 Zones, one per day). In Dystopia, characters will remain available for other missions regardless of the outcome of any combat mission, whether it results in success or failure.
The first 3 days will entail a mix of three Standard, one Miniboss, three Elite and few Bonus missions, while the last day will be the Boss Battle skirmish.
At first, you won’t be able to play all of the available missions. As you progress through Battleworld and earn Perks, you’ll gradually unlock everything.
You’ll start by playing Standard missions. Once you complete these, you’ll unlock a Miniboss mission. Finishing the Miniboss will reward you with special tokens—think of them as keys used to unlock Elite missions. Each Elite mission requires a certain number of keys to access. For example, you might complete three standard missions and a Miniboss in a zone, collect a key, and unlock one of three Elite missions. The other two Elite missions will remain locked until you earn more keys. The next time you play Battleworld, you can collect more keys by taking on additional Miniboss missions, which will then allow you to unlock the remaining Elite missions.
For Battleworld Continent 3, the main team you’ll need is the Daring Warriors. All Elite missions require Daring Warriors, and they’re especially powerful against Maestro.
Completing Elite missions will reward you with Perks, which make your teams stronger, let you hit the Boss harder, and help weaken Maestro even further.
There’s an excellent image on the official website that does a great job illustrating how the Perks system and mission unlocking work, so we’ll share it here as well.
Missions
Standard missions will require players to battle through 5 waves of enemies (a total of 20 enemies) to clear the node and gain VP (victory points).
Miniboss missions are missions where players face off against a strong mini-boss and his team. This will be a single-wave battle.
Elite missions will be missions where you can use Battleworld specialized teams. Daring Warrior is set to become the new team for Battleworld, required for those missions.
Bonus missions are special stages where you can earn extra rewards. These missions will most likely require you to use specific teams.
Boss Battle
At the center of Dystopia stands Maestro—the tyrannical, future version of Hulk who dominates his world with unmatched power and a ruthless grip.
If you thought recruiting Maestro was intense, facing him as a Battleworld Boss takes things to a whole new level. He’s fast, relentless, and his unique Rage mechanic is a ticking time bomb for your entire team. This Boss has the potential to end your run in a single, devastating moment.
Wrath Chooses the Target. Rage Ends the Fight.
Maestro’s passive ability, “Trophy Tyrant,” immediately marks the enemy with the highest Health with Wrath, making your sturdiest character his primary target.
His Rage mechanic is what makes him truly terrifying:
- On every enemy turn, Maestro fills his Speed Bar by 35% and gains 1 stack of Rage.
- Attempts to control him—such as Stun, Ability Block, or Blind—are instantly cleared, and instead, he gains 10 additional Rage.
- Even after being defeated, Maestro returns to the fight with 20 more Rage, even angrier than before.
Countdown to Annihilation: Enrage
A visible timer in Maestro’s kit tracks his Rage. Once he hits 100 Rage, he triggers ENRAGE and wipes out your entire team immediately.
Max Health Reduction
Every one of Maestro’s attacks reduces his target’s Max Health by 25% of the damage dealt. As his Rage increases, Maestro’s basic attack becomes even more dangerous, ramping up both damage and Max Health reduction at certain Rage milestones.
A Fight on Maestro’s Terms
Maestro is designed to force players to strategize differently:
- There’s no cap on the amount of damage he can take in a single turn—unlike previous Battleworld Bosses.
- He is immune to Trauma, Silence, Slow, Darkness, and several other status effects. Trying to apply Stun, Ability Block, or Blind only increases his Rage.
- He cannot be slowed, have his Speed Bar reduced, or be affected by attacks that deal damage based on his own Max Health. However, attacks that scale with the attacker’s Max Health remain effective.
- Opponents can’t gain Deathproof, Immunity, Safeguard, Charged, and cannot be revived during the fight.
Boss Mods
To help turn the tide against Maestro, you can earn and upgrade Boss Mods during your Battleworld run:
- The Maestro’s Wrath: Maestro always targets the enemy afflicted with Wrath. While he’ll still gain Rage from various effects, you can immediately shift the Wrath target to the next healthiest enemy (without Wrath) when hitting these milestones:
- Rank 1: Stun
- Rank 2: +Ability Block
- Rank 3: +Blind
- Slow to Anger: Maestro’s Rage gain is delayed until his next turn after the following events:
- Rank 1: After reviving
- Rank 2: +After defeating an enemy with Wrath
- Rank 3: +On Spawn
- Galvanize: When Maestro applies Wrath, that character also gains:
- Rank 1: 20% Barrier & 1 Deflect
- Rank 2: 30% more Barrier (50% total) & 1 extra Deflect (2 total)
- Rank 3: 50% more Barrier (100% total) & 1 more Deflect (3 total)
With these Boss Mods, you’ll have more tools to stand up to Maestro and give your team a better shot at victory.
Rewards
Each Standard Mission in the first three Zones will reward you with T3 Level 1 Ions upon completion. Miniboss and Elite Missions will grant T3 Level 4 Ions as a reward when completed, while Bonus Missions will provide T3 Level 5 Ions.
Throughout Battleworld, players will earn VP (Victory Points) by completing Miniboss and Bonus Missions. Each member’s VP is added to the Alliance’s total, so everyone’s individual progress contributes to the overall VP collected by the Alliance. Based on the total amount of VP earned, players will receive a certain amount of T3 Iso-8 Credits as rewards.
Maestro character shards will be collected by defeating the Boss. The more times your entire Alliance manages to take down Maestro, the more Maestro Orb fragments and Epic Essence all members will receive. Opening Maestro Orbs will reward you with his character shards.
Epic Essence is used to boost character stats in PVP modes (Chapter Boost) for levels 11 through 15—that is, the final four Boost levels.
Mission Requirements, Rules, and Walkthrough
This section will be slowly updated to include the best strategies and alternative teams to use for each mission.
All walkthroughs have been completed on Difficulty 6 (the highest difficulty), which means they are also applicable to all lower difficulties.
Zone 1 Walkthrough
Standard Mission 1 – City
- Wasteland Power:
- 1% Damage per rank (maximum 20%). Rank up by acquiring Wasteland Power Tokens
This mission is very easy. In the first wave, you’ll face the Unlimited X-Men team, followed by the Darkhold team in the second wave. You can use the Insidious Six, Vigilante, or even the Nightstalkers team (just without Agatha Harkness). We chose Insidious Six and used them for all three Standard Missions as well as the Miniboss mission.
There’s no need for a detailed strategy for Standard Mission 1—just focus on Rogue and Gambit in the first wave, then take out Dazzler. In the second wave, prioritize Morgan le Fay.
Standard Mission 2 – City
- Wasteland Power:
- 1% Damage per rank (maximum 20%). Rank up by acquiring Wasteland Power Tokens
In Standard Mission 2, you start off against the Orchis team. Focus your attacks on Scientist Supreme and Omega Sentinel first, then deal with the rest. The Insidious Six team will have no trouble clearing this stage as well.
In the second wave, you’ll face the Accursed team. Prioritize Satana and Hellverine. Just like Standard Mission 1, this mission is very easy for a well-upgraded Insidious Six team.
Standard Mission 3 – City
- Wasteland Power:
- 1% Damage per rank (maximum 20%). Rank up by acquiring Wasteland Power Tokens
Standard Mission 3 is the first mission that’s a bit more challenging. In the first wave, you’ll be up against the P.E.G.A.S.U.S. team. Don’t use all your abilities right away—start with Vulture’s Special, making sure to hit Rescue, then use Basic attacks with your other characters. You can use Shocker’s Special here as well. Rescue should be your priority target, then take out the rest. You shouldn’t have any trouble clearing this first wave.
The second wave brings in the Secret Defenders along with Super Skrull. Use Scorpion’s Special and target Ghost Rider Robbie—this way, the attack will also hit Photon and Super Skrull. With your other characters, always make sure that one of your targets is Super Skrull. The key ability is Shocker’s Ultimate: if you hit Skrull with it, you’ll reduce his Speed Bar. Skrull will enter Stealth and heal himself when his HP drops below a certain threshold, but that’s nothing to worry about.
With Superior Spider-Man, use your Ultimate and target Robbie—this will also hit Skrull. Once you eliminate Super Skrull, the rest of the enemies shouldn’t give you much trouble. So, save your abilities during the first wave, and in the second wave, unleash everything you’ve got on Skrull.
Miniboss Mision – The Drifter – City
- Wasteland Power:
- 1% Damage per rank (maximum 20%). Rank up by acquiring Wasteland Power Tokens
- Maestro’s Menagerie: The Drifter:
- Old Man Logan is a Miniboss and gains the following:
- Immunity to Exausted and Exposed
- Old Man Logan is a Miniboss and gains the following:
- Feelin’ the Years:
- When Old Man Logan gains Heal Block, he also gains Slow and Trauma for 1 turn
- Price to Pay:
- When Old Man Logan gains Claws Out, if he has Heal Block, he also gains 4 Bleed for 1 turn
Old Man Logan is the Miniboss in Zone 1, and we also used the Insidious Six team here. The strategy is straightforward—just use all available abilities, and you’ll defeat him. You’ll need to take him down twice, since after using his Special, Old Man Logan will apply Revive to himself, but this shouldn’t be a problem. He’s a very easy Miniboss for the Insidious Six team to handle.
Elite Mission 1 – Daring Warrior
- Wasteland Power:
- 1% Damage per rank (maximum 20%). Rank up by acquiring Wasteland Power Tokens
As we already know, the Daring Warrior team is required for all Elite Missions in Dystopia Battleworld. In the first wave of this Elite Mission, you’ll face the Knowhere team. Focus on taking down Nova first. Use Eclipse’s Special, but there’s no need to use Night Thrasher’s Ultimate right away on the first turn. With Speedball, it’s a good idea to use his Special immediately, since it gives Speed Up (2 turns) to the whole team, giving you an advantage when the second wave arrives. Nova is the only opponent here with any real durability; the rest will go down quickly, so the first wave should be easy to clear.
The second wave brings in the Vigilante team. Here, unleash all available abilities—Eclipse’s, Night Thrasher’s, and Daredevil’s Ultimates. Focus on Silver Sable first, then Hit-Monkey. Most players have invested heavily in the Daring Warriors team due to their high usage value in MSF, so if you’re one of them, this mission should be no problem at all.
Elite Mission 2 – Daring Warrior
- Wasteland Power:
- 1% Damage per rank (maximum 20%). Rank up by acquiring Wasteland Power Tokens
The second Elite Mission in Zone 1 isn’t difficult at all for anyone with a decently built Daring Warrior team—and honestly, all players should be aiming to invest in them, since they’re useful in many parts of the game.
In the first wave, you’ll face the X-Force team. You can handle them without much trouble, but it’s a good idea to save the Ultimates of Night Thrasher and Daredevil. Make sure to use Speedball’s Special so your whole team gets Speed Up.
In the second wave, you’ll be up against Dormammu and Undying characters. Dormammu’s Revive doesn’t matter here, because thanks to Eclipse’s Passive, enemies can’t be revived in Battleworld. The Undying team is missing Hela, so after taking down Juggernaut (Zombie), your main target should be Scarlet Witch (Zombie).
With Speed Up, you’ll have the advantage in turn order, making it easy to control the fight. This is the perfect time to unleash all the abilities you saved in the first wave.
Elite Mission 3 – Daring Warrior
- Wasteland Power:
- 1% Damage per rank (maximum 20%). Rank up by acquiring Wasteland Power Tokens
Bonus Mission – Mutant
- Wasteland Power:
- 1% Damage per rank (maximum 20%). Rank up by acquiring Wasteland Power Tokens
For this mission, we decided not to bring Professor Xavier, just to see if it’s possible to complete it without him—and the answer is yes, it definitely is. So, even if you don’t have Professor X, you won’t have any issues here. Our team was Shadow King, Storm (Mighty), Darkstar, Magneto (Phoenix Force), and Omega Red (Phoenix Force). The enemies are the Phoenix Force team, Emma Frost (X-Men), and X-23. This mission has only one wave of opponents.
At the start, use Storm (Mighty)’s Ultimate to apply Slow to all enemies. Shadow King is excellent in this mission because, in Battleworld, he prevents enemies from gaining Immunity before he takes his first turn. On top of that, Storm (Mighty)’s Ultimate reduces the duration of Immunity for all enemies, so Phoenix Force won’t be able to maintain their strong Safeguard + Defense Up + Immunity On Spawn combo.
With Shadow King, use his Special and target Omega Red (Phoenix Force)—this will hit all three Phoenix Force characters and apply Ability Block to each of them. Focus your attacks on Magneto (Phoenix Force) and Omega Red (Phoenix Force) first, then deal with the rest. Since all the enemies have Slow, your characters will get turns ahead of them, giving you a big turn order advantage that’s hard to lose.
When your Magneto (Phoenix Force) and Darkstar use their Ultimates, it will cause chaos among the enemies, and Omega Red (Phoenix Force)’s Special will help you finish the job. You’ll still have Shadow King’s Ultimate left for the end, so with this character combination, you can clear this Bonus Mission quite easily. Even if you lose a character or two, the rest of the team will have no problem finishing off the remaining enemies.
Bonus Mission – Blaster
- Wasteland Power:
- 1% Damage per rank (maximum 20%). Rank up by acquiring Wasteland Power Tokens
For this Bonus Mission, the easiest approach is to bring Odin, so that’s our top recommendation. Alongside him, be sure to include at least one character who is faster than Odin (with a Speed higher than 128). Our team was Odin, Storm (Mighty), Magneto (Phoenix Force), Songbird, and Havok—a very fast and powerful team of Blasters.
In the first wave, you’ll face a group of Vampires. Right from the start, use Storm (Mighty)’s Ultimate to apply Slow to all enemies. Follow up with Songbird’s Ultimate and Magneto (Phoenix Force)’s Special. Your primary target should be the Vampire on your far left—the tall character in a coat (sorry, we forgot his exact name), as he can heal the other enemies. Odin will assist on each of your attacks, and when his turn comes, use his Special to apply powerful buffs on your entire team, and he will also apply his Battlefield Effect to the enemy side.
Once you defeat all the Vampires, the second wave appears: three Nightstalkers (Blade Oath and Man-Thing) along with two Undying characters (Juggernaut (Zombie) and Iron Man (Zombie)). Use everything you have against them, and you shouldn’t have any major issues clearing them out. Especially after Odin’s Special, all your characters will have Speed Up and Offense Up, giving you a huge speed advantage and letting you deal massive damage to the enemy team.
Zone 2 Walkthrough
Standard Mission 1 – Global
- Gamma Ruins Power:
- 1% Damage per rank (maximum 20%). Rank up by acquiring Gamma Ruins Power Tokens
In this zone, Global characters are required for both Standard and Miniboss missions, so we’ll be using four Brimstone characters along with Darkstar. Most players have a strong Brimstone team, which is why we chose this setup.
The first Standard Mission is easy. You’ll face Asgardians in the first wave, and Secret Defenders in the second wave. A powerful Brimstone team, plus Darkstar, will clear all these enemies with no trouble. There’s no need for a detailed strategy here—just use all your available abilities.
Standard Mission 2 – Global
- Gamma Ruins Power:
- 1% Damage per rank (maximum 20%). Rank up by acquiring Gamma Ruins Power Tokens
The second Standard Mission isn’t particularly difficult either. First, you’ll face Superior Six and Out of Time characters—Daimon’s Ultimate will handle most of this wave. In the second wave, you’ll go up against a mix of Spider Society and Astral teams. Here, the enemies will be protected by Sasquatch because he has Taunt, so at the start, focus on taking him down. Once Sasquatch is eliminated, your primary targets should be Peter B. Parker and Spider-Man (Pavitr). There’s no need to hold back your abilities—use everything you have, and you’ll complete this mission as well.
Standard Mission 3 – Global
- Gamma Ruins Power:
- 1% Damage per rank (maximum 20%). Rank up by acquiring Gamma Ruins Power Tokens
The third Standard Mission with Brimstone plus Darkstar also shouldn’t give you any trouble. In the first wave, use Daimon’s Ultimate—this will take out most of the enemies, and you can finish off the rest with Basic attacks.
In the second wave, you’ll face Apocalypse, Quasar, Gorr, America Chavez, and Morbius. Don’t target Apocalypse right away—wait until Daimon, Hellcat, or Darkstar’s turn, then attack him with their abilities. Daimon’s Special will deal heavy damage, and Darkstar’s and Hellcat’s Ultimate can finish him off. After defeating Apocalypse, focus on Quasar.
Miniboss Mision – The Assassin – Global
- Gamma Ruins Power:
- 1% Damage per rank (maximum 20%). Rank up by acquiring Gamma Ruins Power Tokens
- Maestro’s Menagerie: The Assassin:
- Psylocke is a Miniboss and gains the following:
- 20% Speed Bar when attacked
- Immunity to Stun, Ability Block, Exausted, Exposed, and Speed Bar reduction
- Psylocke is a Miniboss and gains the following:
- Preparation:
- On Psylocke’s Basic or Special, 60% chance to gain Stealth for 2 turns if she does not already have it
- When Psylocke gains Stealth, apply Taunt to a random Protector ally
- Opportune Moment:
- Psylocke gains +250% Critical Damage when attacking targets with Defense Down
The Miniboss here is Psylocke, accompanied by three protectors: Tigra, Blob, and Living Mummy. The fight can be tricky until you take out the Protectors, but once they’re gone, it’s basically auto-combat. Use all available abilities with every character. You’ll need to defeat Living Mummy twice because he has Revive. If your team is debuffed, use your own Mummy’s Special to clear the debuffs. Once you’ve eliminated all three Protectors, feel free to switch to Auto— the hardest part is over. You’ll finish this Miniboss mission without any issues.
Elite Mission 1 – Daring Warrior
- Gamma Ruins Power:
- 1% Damage per rank (maximum 20%). Rank up by acquiring Gamma Ruins Power Tokens
This Elite Mission is very easy for Daring Warriors. In the first wave, you’ll face the Eternals and Hellverine along with two Absolute A-Force characters (Kahhori and Medusa). Don’t hold back—start strong with Eclipse’s Special, Night Thrasher’s Ultimate, and Speedball’s Special. If you want, you can save Daredevil’s Ultimate for the second wave.
In wave two, you’ll face Shadow King and Ancient One, together with Nobu, Elektra, and Daredevil (Modern). Focus first on the two Astral characters, then take down the rest. This is a very straightforward and easy Elite Mission.
Elite Mission 2 – Daring Warrior
- Gamma Ruins Power:
- 1% Damage per rank (maximum 20%). Rank up by acquiring Gamma Ruins Power Tokens
Elite Mision 3 – Daring Warrior
- Gamma Ruins Power:
- 1% Damage per rank (maximum 20%). Rank up by acquiring Gamma Ruins Power Tokens
Bonus Mission – Spiderverse & Knull
- Gamma Ruins Power:
- 1% Damage per rank (maximum 20%). Rank up by acquiring Gamma Ruins Power Tokens
This mission can be a bit tricky until you gather the full Symbiote Six team. Until then, Knull, along with Sinister Six characters, will get the job done here.
Our team: Knull, Vulture, Superior Spider-Man, Hobgoblin, and Green Goblin (Classic). The enemy Mephisto won’t be able to become Empowered at the start of the fight, but the most dangerous moment is right at the beginning when he uses his Special—this move can deal massive damage to one of your characters. If your character survives Mephisto’s Special, you’re in good shape to win the mission. It’s especially important that Mephisto doesn’t target Green Goblin (Classic), since he has the weakest stats on the team.
With Vulture, who goes first, use his Special to remove Taunt from whichever enemy has it (usually Ghost Rider). With Superior Spider-Man, use Special and target Daimon Hellstrom to apply Ability Block. Knull should also use his Special, targeting Hellverine to deal damage to him and all surrounding enemies. When it’s Green Goblin (Classic)’s turn, use his Ultimate to reduce the Speed Bar for all enemies and shift the fight in your favor.
Focus your attacks on the enemies with the lowest HP—once you bring them into red health, Knull and the Carnage he summons after using his Special will fill their Speed Bars. Keep targeting the lowest HP enemies so your characters keep taking turns quickly. Use all available abilities at this stage, and you’ll be able to clear this Bonus Mission.
The passive damage from Hobgoblin and the constant high damage you deal with Knull will be the key factors in eliminating all enemies—often before they even get a chance to take a turn.
Bonus Mission – Support
- Gamma Ruins Power:
- 1% Damage per rank (maximum 20%). Rank up by acquiring Gamma Ruins Power Tokens
For this Bonus Mission, we used Darkstar, Emma Frost (X-Men), Falcon (Joaquin), Thunderstrike, and Superior Spider-Man. You’ll be facing the Gamma team.
At the very start, your full focus should be on Brawn, since his passive can fill the Speed Bar and provide Offense Up and 3 Deathproofs to all Gamma characters who drop below 50% HP (this is an older version of Brawn, before his Champion update; new playable Brawn does not apply 3 Deathproofs to Gamma allies who drop below 50% HP). He is your top priority—throw everything you have at him right away and try to eliminate him as quickly as possible. After Brawn, your next target should be Red Hulk.
You can deal heavy damage to Brawn with Emma Frost (X-Men)’s Special. Thunderstrike’s and Darkstar’s Ultimates can also hit all enemies hard. Red Hulk will almost certainly get a turn and use his Special. Even if that KO’s one of your characters, it’s not a problem—you can still finish the mission successfully.
Emma Frost is key here. Her Ultimate can force one of the enemies to attack Red Hulk, which can easily take him out. Darkstar is also crucial, as she deals massive passive damage whenever an enemy is eliminated.
This team of five can clear the mission, but you must stick to the right target priority: Brawn first, then Red Hulk, then everyone else.
Zone 3 Walkthrough
Standard Mission 1 – Cosmic
- Arena of Might Power:
- 1% Damage per rank (maximum 20%). Rank up by acquiring Arena of Might Power Tokens
For Standard and Miniboss missions in Zone 3, you’ll need Cosmic characters. If you have strong Fantastic Four (MCU) members, Odin, and Knull (and you really should), bring them in. With this team, you’ll breeze through all three Standard Missions and the Miniboss fight.
There’s no special strategy needed—just use all available abilities, and you’ll clear these missions with ease.
Standard Mission 2 – Cosmic
- Arena of Might Power:
- 1% Damage per rank (maximum 20%). Rank up by acquiring Arena of Might Power Tokens
For Standard and Miniboss missions in Zone 3, you’ll need Cosmic characters. If you have strong Fantastic Four (MCU) members, Odin, and Knull (and you really should), bring them in. With this team, you’ll breeze through all three Standard Missions and the Miniboss fight.
There’s no special strategy needed—just use all available abilities, and you’ll clear these missions with ease.
Standard Mission 3 – Cosmic
- Arena of Might Power:
- 1% Damage per rank (maximum 20%). Rank up by acquiring Arena of Might Power Tokens
For Standard and Miniboss missions in Zone 3, you’ll need Cosmic characters. If you have strong Fantastic Four (MCU) members, Odin, and Knull (and you really should), bring them in. With this team, you’ll breeze through all three Standard Missions and the Miniboss fight.
There’s no special strategy needed—just use all available abilities, and you’ll clear these missions with ease.
Miniboss Mision – The Champion – Cosmic
- Arena of Might Power:
- 1% Damage per rank (maximum 20%). Rank up by acquiring Arena of Might Power Tokens
- Maestro’s Menagerie: The Champion:
- Hyperion is a Miniboss and gains the following:
- Immunity to Stun, Ability Block, Exausted, Exposed, and Speed Bar reduction
- Hyperion is a Miniboss and gains the following:
- Champion’s Stamina:
- When Hyperion is attacked, he gains 5% Speed Bar for each living enemy
- Champion’s Durability:
- Hyperion gains +15% Damage Reduction each time he loses 30% of his maximum Health, stacking up to +45% at 90% Health lost
The Miniboss in this zone is Hyperion. He’s pretty tough, with a massive amount of HP and the ability to heal himself. As his HP drops, his damage reduction increases, and every time you attack him, he passively fills his Speed Bar.
However, this mostly just makes the fight longer—it’s not a real threat. With constant assists from Odin, Knull, and Human Torch, your overall damage output will eventually wear him down. Don’t underestimate Hyperion, though—he’s not just a tanky Miniboss; he can also deal significant damage to your team.
If the damage Hyperion deals becomes too much, use Odin’s Special to heal up. And if you notice your team is struggling to survive, consider swapping out Human Torch for Mister Fantastic (MCU) for extra mitigation and sustain. With these adjustments, you’ll take down Hyperion sooner or later.
Elite Mission 1 – Daring Warrior
- Arena of Might Power:
- 1% Damage per rank (maximum 20%). Rank up by acquiring Arena of Might Power Tokens
This mission is also very easy for the Daring Warriors and doesn’t require any special strategy. Just use all your abilities, and you’ll clear it without any trouble. In the first wave, focus on Victoria Hand, and in the second wave, target Quasar as your first priority.
Elite Mission 2 – Daring Warrior
- Arena of Might Power:
- 1% Damage per rank (maximum 20%). Rank up by acquiring Arena of Might Power Tokens
Elite Mision 3 – Daring Warrior
- Arena of Might Power:
- 1% Damage per rank (maximum 20%). Rank up by acquiring Arena of Might Power Tokens
Bonus Mission – Galactic Council
- Arena of Might Power:
- 1% Damage per rank (maximum 20%). Rank up by acquiring Arena of Might Power Tokens
To successfully clear all three waves in this mission, you’ll need Annihilus. If you have him, you’ll be able to complete the mission. Without Annihilus, you might get through the first wave, but once the F4 (MCU) characters and Odin appear in the second wave, that’s where your run will most likely end.
In the third wave, Professor Xavier arrives with the X-Men characters. Quasar, Blastaar, and the others simply can’t get through this wave—without Annihilus, they don’t stand a chance at completing the mission.
Bonus Mission – 4 Diamonds
- Arena of Might Power:
- 1% Damage per rank (maximum 20%). Rank up by acquiring Arena of Might Power Tokens
The key here is to have five strong characters with at least four Diamonds each. You probably already have Knull, since all players have had plenty of chances to collect Diamonds for him through the Echoes of Abyss event. Alongside him, someone like Havok is also extremely useful. Our team was Knull, Havok, Omega Red (Phoenix Force), Songbird, and Franklin Richards.
You’ll be facing Blue Marvel in this mission. He’s extremely fast and will take two turns right at the start, which means he can easily knock out some of your characters immediately. The important thing is not to lose three characters right away—if you only lose one or at most two, you still have a good chance to finish the mission, especially if you have someone who can Stun Blue Marvel.
After surviving the opening, use all available abilities on Blue Marvel, and if you’re able to Stun him, your chances of victory go way up.
In our run, after Blue Marvel used his Ultimate and Special, he took out Franklin and Omega, but Havok survived. Later, Havok used his Special and managed to Stun Blue Marvel. After that, we had no trouble finishing him off with the three remaining characters.
Zone 4 – Maestro Boss Battle
Combat Mods:
- The Maestro’s Wrath:
- Rank 1: When Maestro gains Stun, transfer Wrath from the current target to the character with the most health
- Rank 2: When Maestro gains Ability Block, transfer Wrath from the current target to the character with the most health
- Rank 3: When Maestro gains Blind, transfer Wrath from the current target to the character with the most health
- Slow to Anger:
- Rank 1: On Revive, Maestro cannot gain Rage until the start of his next turn
- Rank 2: On Kill, if that character had Wrath, Maestro cannot gain Rage until the start of his next turn
- Rank 3: On Spawn, Maestro cannot gain Rage until the start of his next turn
- Galvanize:
- Rank 1: When Maestro applies Wrath to a character, the target also gains 20% Barrier and Deflect
- Rank 2: When Maestro applies Wrath to a character, the target also gains 50% Barrier and Deflect
- Rank 3: When Maestro applies Wrath to a character, the target also gains 100% Barrier and Deflect
At the start, all three of these Boss Mods are locked. As you complete Elite Missions, you’ll gradually unlock and rank up each of the three Combat Mods, making the fight against Maestro easier.
The Maestro’s Wrath is connected to Elite Missions in Zone 1.
Slow to Anger is unlocked by completing Elite Missions in Zone 2.
Galvanize is tied to Elite Missions in Zone 3.
Each of the three Elite Missions in Zone 1 will grant one rank for the Maestro’s Wrath Mod when completed. The same goes for Slow to Anger in Zone 2 and Galvanize in Zone 3. By finishing Elite Missions in each zone, you’ll unlock and upgrade these important Mods step by step.
Boss Immunities:
- Battleworld Bosses are immune to the folowing:
- Ability Block, Darkness, Exausted, Exposed, Regeneration, Silence, Slow, Stealth, Stun, and Trauma
- Maestro is immune to the folowing:
- Trauma, Exhausted, Exposed, Regeneration, Stealth, Darkness, Silence, and Slow
Spotlight: Daring Warrior and Retcon:
- Daring Warrior, Retcon, an Brimstone character gain +50% Max Health, Damage, Armor, Focus, and Resistance
- If Maestro spawns with 5 Daring Warrior, 5 Retcon enemies, reduce the amount that the damage from Maestro’s attacks reduce the Max Health
Spotlight: Eclipse:
- If Eclipse is present, Maestro does not gain Rage when he gains Blind
Teams We Used for Maestro Boss Fight:
- Professor Xavier + Lady Bullseye + Hit-Monkey + Thanos (Endgame) + Adam Warlock
- Daring Warrior
- Symbiote Six
- Astral + Havok
- Insidious Six + Vulture + Shocker
When we added up all these attacks, we managed to deal almost 6 billion damage—a fantastic result. The highest damage came from the Professor Xavier team, while the others also put up more than solid numbers. It’s worth noting that our Symbiote Six were quite underpowered, since Toxin and Riot only had 2 Yellow/Red stars. As they get stronger, the Symbiote Six team will be able to deal significantly more damage in future runs.
One crucial thing to note: when Maestro reaches 100 Rage, he will instantly defeat all your characters. Each time one of your characters takes a turn, Maestro gains 1 Rage. If you apply Stun, Ability Block, or Blind to him, he gains 10 Rage per effect, so his Rage will fill up much faster. To avoid this, don’t use characters or abilities that inflict Stun, Ability Block, or Blind on Maestro. The exception is Eclipse—while she’s present, Maestro doesn’t gain Rage from Blind.
If you’ve completed Elite Mission 1 in Zone 1, an extra mechanic comes into play. Whenever Maestro is stunned, he will change his primary target. At the start of the fight, Maestro applies Maestro Wrath to your character with the highest HP, making them his main target until they’re defeated. But if you have Boss Mode (from clearing Elite Mission 1), every time Maestro is stunned, he will transfer Maestro Wrath to the next character with the highest HP. So, even though a Stun will give him 10 Rage, you can save one of your characters by shifting his focus. The best strategy is to let Maestro attack his primary target for a while, and when that character is in danger, use a Stun to force Maestro to switch targets.
Professor Xavier + Lady Bullseye + Adam Warlock + Hit-Moneky + Thanos (Endgame)
With Professor Xavier’s team, players can deal massive damage—perfect for Alliances aiming to rack up as many Maestro kills as possible and recruit him quickly.
This team is built around keeping Maestro Stunned and denying him turns. Normally, Maestro is immune to Trauma and, when Stunned, instantly clears the effect and gains 10 Rage. However, thanks to Professor’s Passive, any enemy with Defense Down who is immune to Trauma loses that immunity. This lets you apply both Trauma and Stun to Maestro and keep him locked down.
Here’s how it works in practice:
- At the start, use Lady Bullseye’s Ultimate to apply Defense Down (and other debuffs) to Maestro.
- Next, use Thanos (Endgame)’s Special to apply Trauma + Stun (2 turns) to Maestro. Because of Trauma, Maestro won’t be able to clear Stun and will be stuck.
- The goal is to keep Maestro Stunned throughout the fight. Thanos’s Special has a short cooldown (just 3 turns), and both Hit-Monkey and Lady Bullseye can extend the Stun duration with their Specials.
- With Lady Bullseye’s Special, you extend the duration of all negative effects on Crit—so she must be set as a Raider. Even if she doesn’t Crit and fails to extend Stun, the situation is tougher but still manageable.
- Hit-Monkey’s Special also extends all negative effects.
- Adam Warlock uses only Basic attacks to extend the duration of other debuffs (though not Stun) and to apply extra Bleed.
Best Iso-8 Classes for This Fight:
- Lady Bullseye: Raider
- Professor Xavier: Striker
- Adam Warlock: Striker
- Hit-Monkey: Striker
- Thanos (Endgame): Raider
Turn-by-turn strategy:
- Open with Lady Bullseye’s Ultimate, then use Basics with everyone else (except Thanos).
- Use Thanos (Endgame)’s Special as soon as Maestro has Defense Down to apply Stun for 2 turns.
- Whenever Maestro has fewer than 3 stacks of Stun (1 or 2), and Lady Bullseye or Hit-Monkey’s Special is available, use it to extend Stun.
- If Thanos’s Special is ready but Maestro already has 2 or 3 Stun, wait until it drops to 1 before using it.
- With Professor Xavier, use only Basic and Ultimate—never his Special, as it applies Ability Block and instantly increases Maestro’s Rage.
- With Adam Warlock, stick to Basic to keep extending debuffs and applying Bleed.
- If Lady Bullseye fails to Crit and doesn’t extend Stun, you might lose all Stun stacks, and Maestro could take a turn before Thanos’s Special is available. In that case, Adam Warlock and Hit-Monkey can use their Ultimates to apply a 1-turn Stun and help regain control.
With this team, you can rack up huge damage. We managed to deal around 3.5 billion damage before the timer ran out—roughly 100% of Maestro’s health. Depending on the power of those 5 characters, you may be able to do even more.
Maestro Boss Battle Video
Conclusion
The full Battleworld: Dystopia experience is still ahead of us, and only time will tell how the gameplay will unfold. We’ll get to see it all in action very soon.
One thing is certain: the Daring Warriors team is essential for this Battleworld. They’re required for all Elite Missions, and without completing those missions, you won’t get the extra boosts needed to take on the Maestro Boss more effectively. If nothing else, make sure to invest in this team—they’re not only specialized for Crucible and Battleworld, but they’re also very important for the Breaker Event: Silver Surfer. Overall, their usefulness across the entire game is extremely high.
In addition to Daring Warriors, the Retcon and Brimstone teams will also be very important against Maestro, as they’ll receive stat bonuses during the Boss fight. So, if you want to perform well against Maestro, make sure not to overlook these two teams either.
If you have any questions about Battleworld or need any help with MSF feel free to reach out to us via our Discord:

